

Choose wide‑mouth glass jars or freezer‑safe zip‑top bags, then cut scraps into bite‑size pieces and spread them on a tray for a quick pre‑freeze. Once solid, pack about four cups per bag, leave a couple of inches of headspace, and label each pack with the content and date. Store jars upright, coldest side near the vent, and rotate older items forward. Follow these steps and you’ll keep your scraps fresh, organized, and ready for soups, stews, and sauces.
Pick the Best Containers for Freezing Kitchen Scraps

How do you keep kitchen scraps fresh without drowning in plastic? Choose freezer jars that are glass containers with wide-mouth openings; they let you scoop, seal, and stand upright after freezing. Before you start freezing scraps, chill them to avoid shattering, then leave a couple of inches of headspace so expansion won’t crack the jar. Arrange the jars neatly for freezer organization, keeping the coldest items near the vent and avoiding haphazard stacking. This setup helps prevent freezer burn and maintains plastic‑free storage. When you’re ready to use them, follow thawing safety: move jars to the fridge for gradual thawing and cooling, never rush the process. The result is clean, reusable containers that keep your food fresh and your kitchen eco‑friendly. Food-Safe Glass also benefits from proper labeling so you can track contents and use-by dates.
Portion Scraps for Freezing Kitchen Scraps
Ever wondered how to make thawing faster and waste lower? You should cut your stock scraps into bite‑size piles, then spread them in a single‑layer freezing layout on a tray. Once solid, transfer each sheet into freezer bags or an airtight container for portion control. This method prevents clumps, keeps freezer storage organized, and boosts thawing speed when you need them for stock making. Pack about four cups per bag, label and date each pack, and stack them beside other frozen components. By using single‑layer freezing and clear labeling, you’ll always know which scraps are oldest, reduce waste, and have ready‑to‑use portions for soups, stews, and sauces.
Label and Organize Frozen Kitchen Scraps
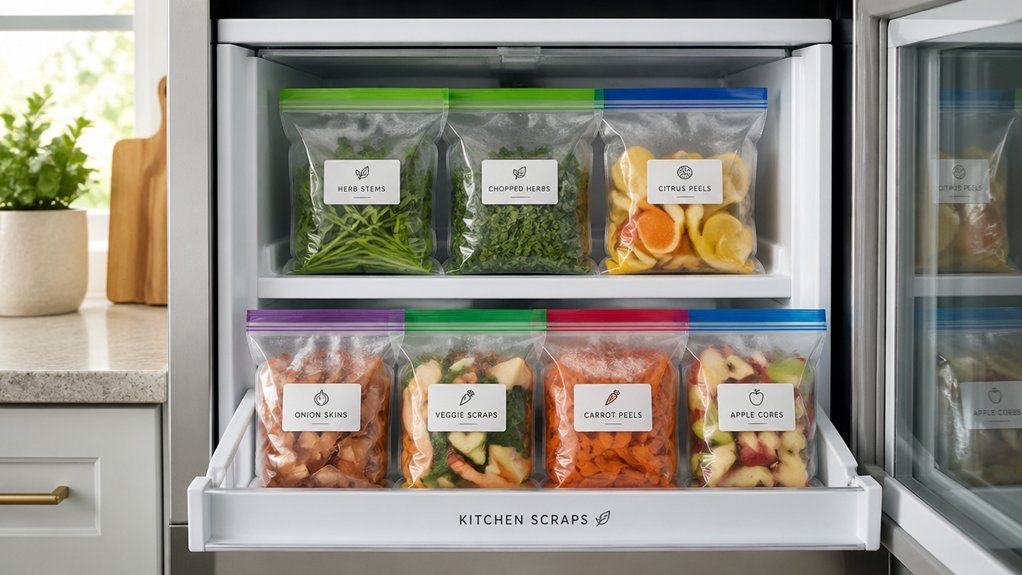
A well‑labeled freezer makes grabbing the right scraps a breeze and cuts waste. You’ll keep freezer scraps tidy by type, using clear freezer‑safe containers or zip‑top bags with proper headspace. Label each item with contents and date, then stack them for quick stock or broth retrieval. Avoid overpacking bags to reduce air exposure and prevent freezer burn. When you need to thaw, move a labeled portion to the fridge or a sealed bag in cold water, changing the water every 30 minutes. Measuring and tracking the contents can also simplify meal planning and reduce waste inventory clarity.
- Container choice – Use rigid jars for liquids, leaving ½‑inch headspace; use flexible bags for veggies, flatten them to fit.
- Labeling system – Write the ingredient, date, and intended use (stock, broth) in bold ink.
- Organization routine – Group similar scraps together, rotate older items forward, and check labels before thawing.
Frequently Asked Questions
Can You Freeze Kitchen Scraps?
Yes, you can freeze kitchen scraps. Just gather your veggie and meat trimmings, pack them into freezer‑safe bags or containers, label and date them, then store them in portions for later stock.
What Is the Penny Freezer Trick?
You’ll find no official “Penny Freezer Trick” in the material; it isn’t defined, so you can’t describe it. Instead, focus on standard scrap‑freezing methods like airtight jars, small portions, and labeling.
Which Vegetables Are Not Good for Freezing?
You should skip freezing onions, Brussels sprouts, broccoli, cauliflower, turnips, and artichokes—they become bitter or mushy. Also avoid any spoiled or wilted veggies, and never freeze meat that’s gone bad.
What Three Items Should Not Be Placed in a Compost Pile?
You should keep spoiled meat, bones or large fat trimmings, and onion peils that cause odor or pests out of your compost pile, because they attract pests, slow decomposition, and can introduce harmful microbes.
In Summary
Now you’ve got the right containers, sized portions, and clear labels, freezing kitchen scraps becomes a breeze. You’ll keep nutrients intact, reduce waste, and always have fresh ingredients on hand. Stick to these steps, and your freezer will stay organized while your meals stay flavorful and budget‑friendly. Happy cooking!


Leave a Reply