
You can produce finished compost in as little as four weeks year-round by mastering hot composting with proper balance, aeration, and moisture. Start by choosing your method—hot composting for speed or cold composting for low maintenance—then pick a well-drained location at least 10 feet from your house. Layer browns and greens in a 3:4 ratio, maintain wrung-out-sponge moisture, and aerate weekly to prevent odors. Seasonal adjustments and proper harvesting techniques’ll transform your organic waste into nutrient-rich finished compost. The details that separate struggling from thriving composters await you.
Choose Your Composting Method for Year-Round Use

How do you want to compost year-round—fast or simple? Your answer determines which method suits you best.
Hot composting delivers finished compost in as little as 4 weeks when you maintain proper carbon-nitrogen balance, regular aeration, and moisture levels. You’ll need steady organic input and willingness to monitor conditions, but you’ll get the bonus of destroying weed seeds, diseases, and pesticide residues through high heat.
Hot composting transforms organic waste into finished compost in just 4 weeks with proper balance, aeration, and monitoring.
Cold composting requires minimal attention to ratios, aeration, or moisture. This low-maintenance approach works well for smaller waste amounts, though decomposition takes 1 to 2 years. You’ll mix occasionally and keep materials moist.
Vermicomposting produces nutrient-rich castings in 3 to 6 months indoors year-round, ideal for limited outdoor space. For apartment dwellers seeking even faster processing, black soldier fly composting systems can break down organic waste in 2 to 4 weeks while producing minimal odor. Trench composting buries waste directly in soil for odorless, maintenance-free disposal without immediate harvest expectations. By composting at home, you divert organic waste from landfills and reduce overall waste management costs.
Pick Your Location and Container Type
Where you place your compost bin matters as much as what you put inside it. You’ll want to locate it close to your kitchen or garden to encourage consistent use, even during winter and rainy seasons. Choose well-drained ground on flat terrain to prevent waterlogging and anaerobic conditions that cause odor problems.
Partial sunlight works best—it warms your pile without over-drying materials. Position your bin away from strong winds and at least 10 feet from your house to minimize odor and pest concerns. Avoid placing it directly against fences, which restricts airflow and maintenance access. Keeping the bin near a water source ensures you can easily maintain the moisture levels essential for decomposition. Layering waste with moisture control aids helps prevent soggy scraps that slow microbial activity.
For container type, consider your space and needs. Open piles require good drainage, while enclosed bins or tumblers offer a tidier appearance. Three-chamber systems support efficient batch management and strong air circulation.
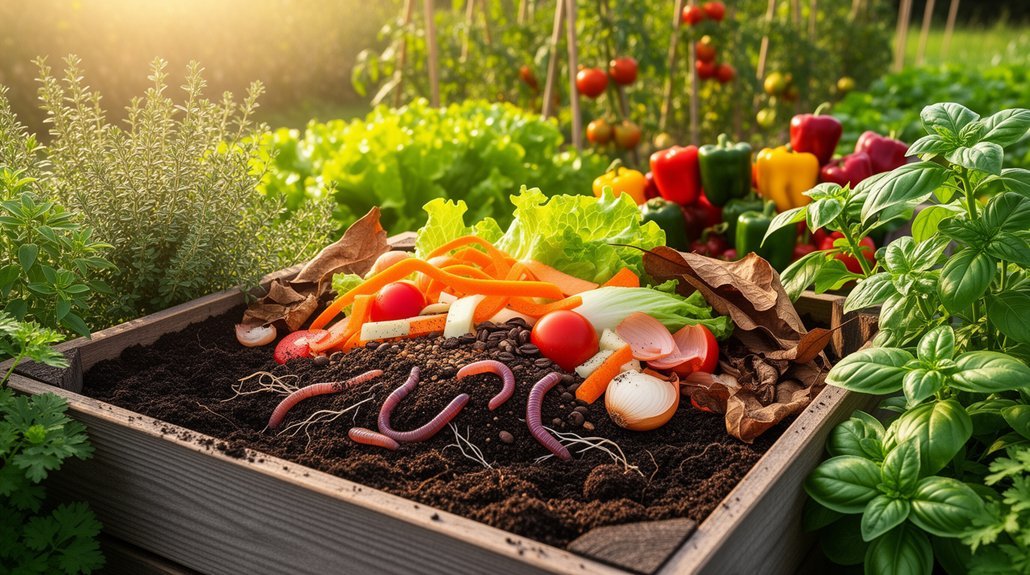
Layer Browns and Greens for Optimal Breakdown

You’ll want to aim for roughly 3 to 4 parts browns to 1 part greens by volume, though a near 50/50 mix works fine if you chop materials small and keep them airy. Always bury your food scraps in the center of a layer and cover them completely with brown material, since exposed kitchen waste attracts pests and creates odors. Building your pile with alternating brown and green layers—even without precision measurements—creates the airflow and structure you need for faster, more reliable decomposition. For best results, consider using a brown matter shredder to break down larger brown materials into smaller pieces that will decompose more quickly and integrate better with your green layers. Maintaining proper moisture levels, similar to a mildly wrung-out sponge, ensures that heat generation and microbial activity proceed efficiently throughout your compost pile.
Brown and Green Ratio
Why does the brown-to-green ratio matter so much? Because you’re balancing two essential nutrients that make or break your compost success.
Aim for a 3:1 or 4:1 brown-to-green ratio by volume. You can use the simple bucket method: three to four buckets of browns for every bucket of greens. This rough guideline works because:
- Too many greens create soggy, smelly piles that go anaerobic and lose nitrogen as ammonia
- Too many browns starve microbes of nitrogen, leaving your pile cold and stalled
- The right balance generates heat, speeds decomposition, and produces finished compost faster
Browns provide carbon for microbial energy; greens supply nitrogen for growth. Fresh grass clippings, food scraps, and manure need extra browns to balance their nitrogen load. Dry leaves, straw, and shredded paper work perfectly as carbon-rich additions. For compact urban spaces, bokashi fermentation systems can pre-process food scraps before adding them to your brown-and-green pile. Regular turning of your pile exposes browns and greens to moisture and heat, which optimizes microbial activity and accelerates the breakdown process.
Proper Food Scrap Coverage
For animal products and cooked foods, dig deeper—bury them 12 to 18 inches under soil to prevent rodents and insects from reaching them.
Browns also absorb excess moisture, preventing your pile from becoming soggy and smelly. Brown materials like dry leaves and cardboard are essential for maintaining the proper carbon-to-nitrogen balance in your compost system. Selecting the right tool, such as a compost turning fork, makes it easier to manage and turn your brown and green layers effectively throughout the composting process.
Keep Your Pile Moist and Hot
How do you keep a compost pile performing at peak efficiency? You’ll maintain the ideal “wrung-out sponge” moisture—around 50-65%—while generating the heat that accelerates decomposition.
Here’s what makes the difference:
- Water strategically: Add moisture slowly during pile turns and in evening hours to minimize evaporation while ensuring even distribution through all layers.
- Monitor constantly: Dry piles lose microbial diversity and fail to reach the 120-140°F temperatures needed for rapid breakdown, while overly wet piles smell anaerobic.
- Adjust for climate: Hot climates may require starting near 60% moisture, with rewetting every 7-10 days as piles naturally lose roughly 1% daily. Apply a thick biocover layer over your pile to armor moisture and protect from wind and sun.
Use partial shade and covers to reduce drying without restricting airflow. Pair your moisture management with aerator tools to ensure proper oxygen distribution throughout the pile. When your pile no longer holds together like a sponge, it’s time to water.
Aerate Weekly for Faster Decomposition

Regular aeration is what transforms a sluggish pile into a decomposition powerhouse. By turning your compost weekly, you’re moving outer material to the center where it breaks down faster, while inner material moves outward to experience fresh microbial action. This mixing breaks up compacted layers that block airflow and expands surface area for microorganisms to colonize.
You don’t need fancy equipment—a fork or shovel works perfectly for manual turning. Alternatively, corkscrew aerators or even a broomstick can create air channels without fully dismantling your pile. For minimal effort, poke holes strategically throughout compressed zones. Introducing aerobic organisms like compost worms naturally enhances aeration within the pile. Proper aeration prevents anaerobic decomposition that causes foul odors and attracts pests to your bin.
Consistent weekly aeration delivers results: faster decomposition, eliminated odors, and higher-quality finished compost. You’ll notice better heat distribution and complete breakdown of stubborn clumps. Your garden will thank you.
Fix Composting Odors and Wet Piles
Why does your compost smell like rotten eggs or a sewage treatment plant? Waterlogged piles shift decomposition from aerobic to anaerobic, producing hydrogen sulfide and foul odors. You’ve likely added too many fresh scraps, wet grass, or rain without balance.
Fix your pile by addressing three key issues:
- Restore airflow – Turn compacted layers and break up dense spots so oxygen reaches decomposing materials
- Add dry browns – Layer leaves, cardboard, or straw to absorb excess moisture and rebalance your carbon-to-nitrogen ratio
- Improve drainage – Prevent pooling at the base by elevating your bin or creating air gaps underneath
Your compost should feel like a wrung-out sponge and smell earthy. Persistent odors signal imbalance demanding immediate correction through aeration and material adjustment. Using compost activator powders between batches can accelerate microbial decomposition and reduce odor-causing anaerobic conditions. Between batches, clean the compost bin to prevent odor carryover and restart your composting cycle fresh.
Speed Up Summer Decomposition, Protect Winter Piles

When summer arrives, your compost pile becomes a microbial powerhouse—warm temperatures and moisture create ideal conditions for rapid decomposition, but you’ll need to stay vigilant about moisture levels and material choices to keep the process humming.
| Strategy | Summer Action | Winter Action |
|---|---|---|
| Pile Size | Maintain 3x3x3 feet minimum | Larger piles retain heat better |
| Moisture | Water during layering; add water-rich scraps | Reduce watering; stockpile shredded leaves |
| Materials | Use fresh clippings, shred large branches | Mix late-season greens with leaves |
| Turning | Turn every 3–7 days for aeration | Turn less frequently to preserve heat |
Target 130–160°F for hot composting. Choose fast-breaking materials like grass clippings and coffee grounds. Shred everything to increase surface area. Wearing nitrile-based gloves protects your hands while handling sharp materials and maintaining optimal compost conditions. Winter slows microbial activity dramatically, so insulate bins and cover piles to minimize heat loss and maintain usable carbon-nitrogen balance throughout cold months. Compost activators can help jump-start your pile when winter conditions make natural decomposition sluggish.
Harvest and Use Your Finished Compost
How do you know when your compost is truly ready? Look for dark, earthy-smelling material with no visible food scraps. After mixing, finished compost shouldn’t heat up, and you’ll notice it’s shrunk to about one-third of its original volume.
Once you’ve confirmed readiness, separate finished material from unfinished chunks using a rake or mesh screen. Return large organic pieces for further decomposition.
You can now enjoy the fruits of your labor:
- Mix finished compost with potting soil for thriving container gardens
- Spread a thin layer around plants to suppress weeds and retain moisture
- Apply up to 1/2 inch on lawns and seeded beds for nutrient-rich growth
Store bagged compost in cool, dry conditions. Let it rest a few weeks longer—it’ll continue maturing and enhance your garden’s health. Many worm composting bins include a spigot for worm tea collection, which provides an additional nutrient-rich amendment for your garden. Nearly ready material can be used as mulch around established shrubs if you prefer not to wait for complete decomposition.
Frequently Asked Questions
Can I Compost Meat, Dairy, and Oils, or Will They Attract Pests?
You shouldn’t compost meat, dairy, and oils in your home pile—they’ll attract rodents, flies, and raccoons while creating foul odors. Stick with fruit scraps, vegetables, coffee grounds, and leaves instead.
How Do I Know When My Compost Is Fully Finished and Ready to Use?
You’ll know your compost’s finished when it’s dark brown, crumbly, and earthy-smelling. The pile should feel cool, shrink to half its original size, and contain mostly unrecognizable ingredients. Run a seed germination test to confirm readiness.
What’s the Difference Between Compost and Mulch, and How Do I Use Each?
You’ll mix compost into soil to enrich it with nutrients and improve structure. You’ll spread mulch on top to suppress weeds, retain moisture, and moderate temperature. Combine both for ideal results.
Can I Compost Diseased Plants, or Will Pathogens Survive in My Pile?
You shouldn’t compost diseased plants unless you’re certain your pile reaches and sustains 150°F+ for several days. Most home piles don’t get hot enough, so you’re risking pathogen survival. Bag diseased material for disposal instead.
How Much Finished Compost Will I Get From My Starting Materials?
You’ll get roughly 30-50% of your starting volume as finished compost. A 27-cubic-foot bin yields about 8-14 cubic feet. You’ll need substantially more raw material than desired final compost because of water evaporation and carbon dioxide release.
In Summary
You’ve now got all the tools you need to maintain a thriving compost system throughout every season. By selecting the right method, balancing your browns and greens, and staying on top of moisture and aeration, you’ll transform your kitchen scraps and yard waste into rich, dark compost. You’re ready to start composting year-round and reap the rewards of nutrient-dense soil for your garden.


Leave a Reply