
Aim for a C:N ratio around 20:1–30:1 by mixing carbon‑rich browns and nitrogen‑rich greens in a 3:1 to 4:1 volume ratio. Use shredded cardboard, dry leaves, or wood chips for browns and fruit scraps, coffee grounds, and finely chopped veg for greens. Keep the pile moist like a wrung‑out sponge, turn it weekly, and add extra browns if you smell ammonia or spot soggy patches. Following these steps will keep your tiny bin odor‑free and fast‑acting.
Set the Ideal C:N Ratio for Tiny‑Space Composting

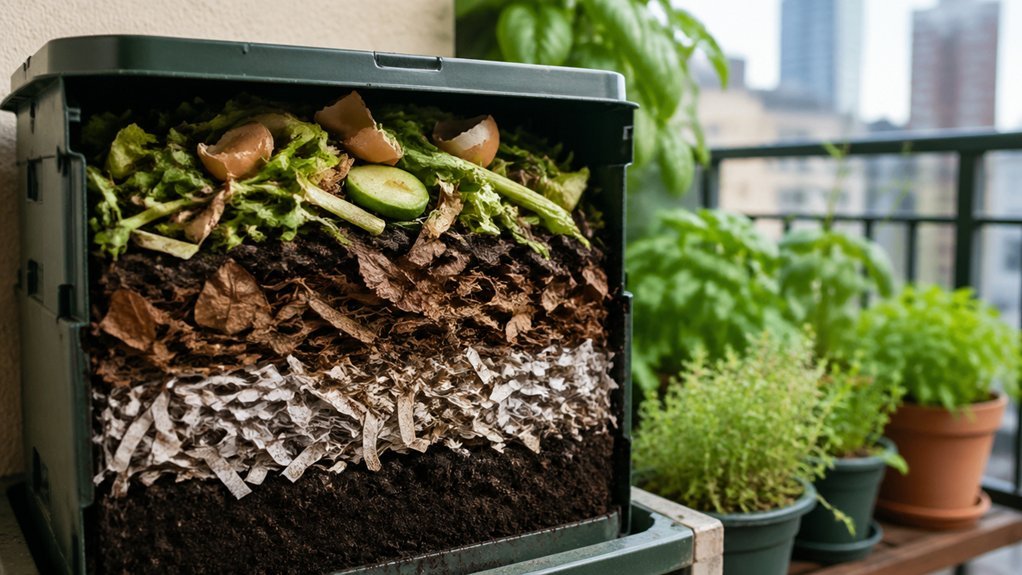
How do you keep a tiny compost bin humming without stinking? You start by aiming for a C:N ratio around 20:1 to 30:1. In practice, that means mixing browns and greens by volume in roughly a 3:1 to 4:1 split. Browns—wood chips, dried leaves, shredded paper—supply carbon, while greens—fruit scraps, coffee grounds, vegetable peels—provide nitrogen. If you add a high‑C material like corn stalks (≈60:1), boost the greens or sprinkle water to pull the ratio back toward the target. Keeping the pile moist but not soggy and turning it occasionally supplies oxygen, which together with the right C:N ratio fuels thermophilic microbes. The result is fast, odor‑free decomposition even in a cramped bin. The choice of sturdy, rust‑resistant tools for screening and mixing, such as a metal compost sifter, can help you keep the texture ideal for small-space setups rust‑resistant tools.
Translate a 20:1–30:1 C:N Goal Into a Tiny‑Space Composting Mix
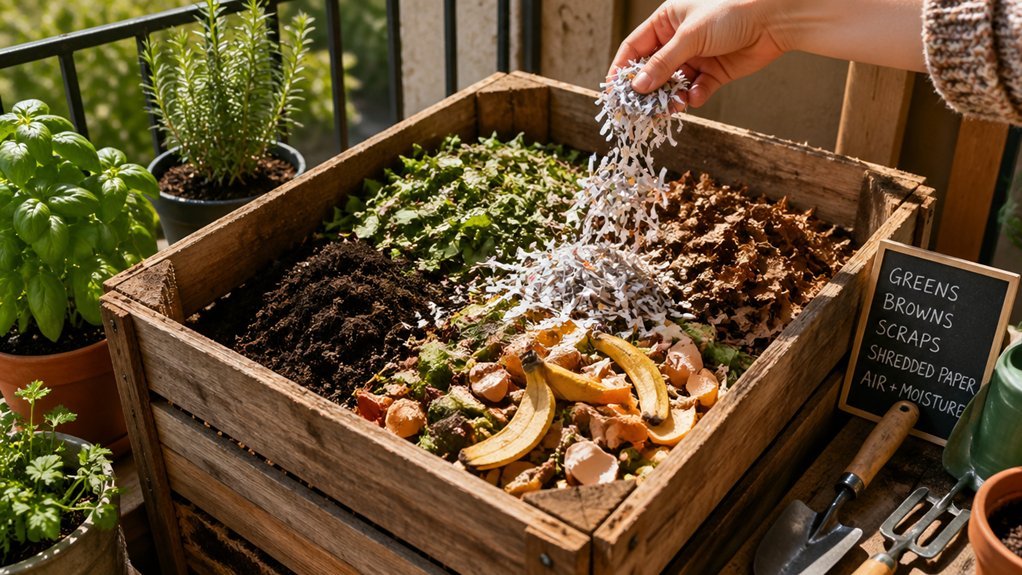
You can hit the 20:1–30:1 C:N target by aiming for roughly a 3:1 to 4:1 volume mix of browns to greens in your tiny bin.
Start with a half‑volume of finished compost or soil, then add small, chopped greens and regular browns to keep the balance.
If the pile smells sour or gets soggy, toss in more browns; if it slows down or dries out, boost the greens.
As you monitor ongoing fermentation, be mindful of maintaining odor control and tight containment to support a compact, balcony-friendly setup. odor control
Mix Ratios
Ever wondered how to hit a 20:1–30:1 C:N ratio without a lab? In a tiny space you can approximate the target by stacking three‑to‑four parts high‑carbon browns with one part nitrogen‑rich greens. This simple rule of thumb lets you keep compost ratios in check without weighing anything. Add shredded cardboard, dry leaves, or wood chips as browns, and toss in fruit scraps, coffee grounds, or yard clippings as greens. Small, frequent additions and regular turning keep aeration high and odors low, nudging the pile toward the desired range. Utopia Kitchen Indoor Compost Bin with Charcoal Filter provides a convenient counterspace option to manage these inputs efficiently charcoal filter for odor control.
C:N Balance Tips
When you aim for a 20:1–30:1 C:N ratio in a tiny compost bin, start by visualizing a three‑to‑one volume mix of high‑carbon browns to nitrogen‑rich greens; this simple proportion—three parts shredded cardboard, dry leaves, or wood chips to one part fruit scraps, coffee grounds, or kitchen veg—usually lands you around a 26:1 ratio, keeping the pile aerobic, moist, and odor‑free while you fine‑tune the balance with small, frequent additions and regular turning.
To maintain C:N balance, monitor texture: add extra dried leaves if the mix feels soggy, or sprinkle a handful of coffee grounds when it looks too dry.
Keep the bin loosely packed to allow airflow, and stir every few days.
Small adjustments keep the C:N ratio in the sweet spot, preventing ammonia smells and speeding decomposition.
A rotating dual‑chamber design can help you separate active & curing batches, supporting steady throughput dual chamber while you manage inputs and aeration.
Pick the Right Browns for Small or Worm Bins

Which browns work best in tiny or worm bins? You need fast‑breaking, low‑density materials that keep the pile airy and avoid lumps. Shredded cardboard, paper towels, and non‑glossy paper are ideal because they decompose quickly and provide structure without compacting. Add them gradually, mixing often to introduce oxygen and maintain a moist‑but‑not‑soggy environment for worms. Keeping the browns balanced with greens at roughly a 1:1 volume ratio prevents odor and anaerobic spots. Regularly fluff the mix to keep air flowing and your tiny compost thriving. Odor control
Select Greens for Tiny‑Space Composting Without Over‑Moisturizing
Now that you’ve got the right airy browns, focus on the greens that won’t drown your tiny bin. Aim for a 1:1 volume ratio of browns to greens, keeping the greens as dry as a wrung‑out sponge. Chop fruit and vegetable scraps, coffee grounds, tea bags, and eggshells into bite‑size pieces; a handful of grass clippings works if you shred them finely. Layer each green addition with a thin sheet of shredded paper or cardboard to soak up excess moisture. Stick to the 50 % greens rule in small batches, which preserves aeration and curbs anaerobic smells when you can’t turn the pile often. If space is extremely limited, try bokashi pre‑processing or a tiny worm bin to handle greens without piling volume. For ongoing efficiency, consider choosing enzyme-based accelerators that help break down organics more consistently in small spaces enzyme-based accelerators.
Balance Moisture in a Compact Compost Bin

If you keep the bin “moist but not drippy,” you’ll avoid soggy spots and foul smells while still giving microbes the water they need. Aim for a balanced dampness by layering greens—fruit and veggie scraps or coffee grounds—with dry brows like shredded paper. Check the pile daily; any wet patches mean it’s time to toss in more browns and give the bin a quick turn. Small, frequent turnovers keep the material aerated and prevent compaction, which otherwise traps moisture. When the mix feels dry, mist it lightly; when it’s too wet, add a thicker layer of dry material. Greens provide moisture and nitrogen material composition and Browns absorb excess water and add carbon. Turn the bin every few days to even out humidity.
Quick‑Chop Techniques That Speed Up a 3‑Foot Cube or Smaller
Ever wonder how a few simple cuts can turn a cramped three‑foot cube into a fast‑acting compost powerhouse? You can start by shredding all greens into bite‑size pieces with a kitchen processor, hand‑chopper, or garden shears. The smaller the fragments, the quicker microbes can access carbon and nitrogen, so you’ll see temperature spikes in a confined bin. Aim for thin layers—about an inch of greens, then an inch of browns—so air circulates and compaction stays low. If you have dense material like cardboard, run it through a shredder before layering.
Keep the moisture level like a wrung‑out sponge, and turn the pile every few days to expose fresh greens to oxygen. These quick‑chop habits keep a tiny compost system humming.
Use a Tumbler or Rotating Drum for Tight‑Fit Aeration
How can a compact tumbling drum turn a cramped corner into a thriving compost hub? You’ll find that a 30‑60 gallon tumbler fits snugly under a counter or on a balcony, keeping composting ratios balanced while delivering constant aeration. By rotating the drum every few days, you maintain airflow, boost oxygen, and avoid the smell of anaerobic breakdown. The sealed design also deters pests, letting you focus on the mix rather than cleanup. Regular turning—once a week or bi‑weekly—keeps moisture and temperature in the sweet spot for rapid decomposition.
A compact tumbler fits tight spaces, delivering constant aeration, balanced ratios, and odor‑free, rapid composting.
- Quick mixing of browns and greens preserves optimal composting ratios.
- Built‑in access makes turning effortless in tight spaces.
- Enclosed drum reduces odors, protecting nearby living areas.
Manage Odor and Pests in an Apartment‑Sized Compost Container
A tumbling drum keeps the compost aerated, but the real challenge in an apartment is preventing odor and pests. You’ll want a sealed, gasketed lid that locks in smells and blocks vermin. After each green addition, sprinkle a thick carbon‑rich layer of shredded paper or cardboard for odor control and moisture absorption. Chop scraps into bite‑size pieces and keep the mix as damp as a wrung‑out sponge; excess moisture fuels foul aromas and attracts insects. Turn the tumbler every few days to maintain aerobic conditions and avoid ammonia buildup.
Finally, store the container in a cool, low‑traffic spot and check seals regularly—any leak invites pests, and a tight seal keeps your kitchen fresh.
Adjust the Browns‑to‑Greens Ratio When Scraps Arrive Faster Than Browns
When greens pile up faster than browns, you should prioritize adding browns first to keep the mix balanced.
If you can’t get enough browns right away, freeze the greens temporarily and store them in the fridge.
Add a little water only when the pile feels dry, but avoid over‑wetting.
Prioritize Browns First
Ever noticed how a pile of kitchen scraps can turn soggy in minutes if you don’t add enough dry material first? In tiny spaces you should add browns before greens to create structure and soak up excess moisture. Aim for a 3:1–4:1 browns‑to‑greens volume ratio whenever scraps arrive faster than dry matter. Start with shredded cardboard, paper towels, leaves, or wood chips to form aeration channels and keep the heap from compacting. When greens show up, toss a handful of browns on top right away to prevent slime, ammonia smells, and a wet, clumpy texture.
- Use a thin layer of browns after each green addition.
- Keep the pile loosely packed, not solid.
- Check moisture daily and adjust browns as needed.
Freeze Greens Temporarily
Ever wondered how to keep your tiny‑space compost from turning into a smelly, soggy mess when greens arrive faster than browns? Freeze the surplus greens right away. By placing fruit and vegetable scraps in a zip‑lock bag and popping them into the freezer, you lock in moisture, curb ammonia odors, and keep pests at bay until you have enough dry material. When you’re ready to compost, thaw the greens so they blend smoothly with your browns. Aim for a 1:1 to 2:1 greens‑to‑browns ratio by volume after thawing, then gradually add more browns—dry leaves, wood chips, shredded cardboard—stored in a dry bin. This simple pause lets you maintain balance without soggy, smelly piles in limited space.
Add Water Sparingly
How do you keep your tiny‑space compost from turning soggy when greens pile up faster than browns? Add water sparingly by tweaking the browns‑to‑greens ratio the time fresh scraps arrive. Aim for a “moist but not drippy” pile; when you notice excess moisture, boost carbon‑rich browns to restore moisture balance. Use drier materials like shredded paper, dry leaves, or wood chips to soak up liquid and improve aeration. Turn the pile regularly to introduce air and prevent ammonia odors.
- Increase browns to roughly a 1:1 ratio with greens.
- Choose the, absorbent browns (paper, dry leaves).
- Turn the compost to boost porosity and reduce wet spots.
These steps keep your compact bin functional and odor‑free.
Monitor Temperature and Turn Frequency in a Limited‑Space Setup
Curious about keeping your tiny compost thriving? You’ll want to keep a close eye on temperature and turn your bin regularly.
Aim for a 3:1 brown‑to‑green mix, then check the heat daily. When it hits 130°F (54°C) or higher, you’re in the thermophilic zone—great for fast breakdown. If it climbs too high, toss in extra browns to cool it down and balance moisture. If it slips below 110°F (43°C), add more greens to fire up microbes.
Turn the pile at least once a week; more frequent turns boost aeration, speed heating, and curb ammonia smells. Small tums or dual‑bin units help you monitor heat uniformly in tight spaces, keeping the process steady and odor‑free.
Switching From Hot to Slow or Vermicompost in Tiny Spaces
You’ll find a space‑efficient vermicompost system fits tiny apartments better than a hot pile, so start by swapping to a worm bin or sealed tumbler. Transition gradually: mix in small batches of slow‑compost material, keep the browns‑to‑greens ratio close to 1:1, and monitor moisture so the mix feels like a wrung‑out sponge. Light feeding, frequent air bursts, and regular leachate removal will keep the process steady without overheating or odors.
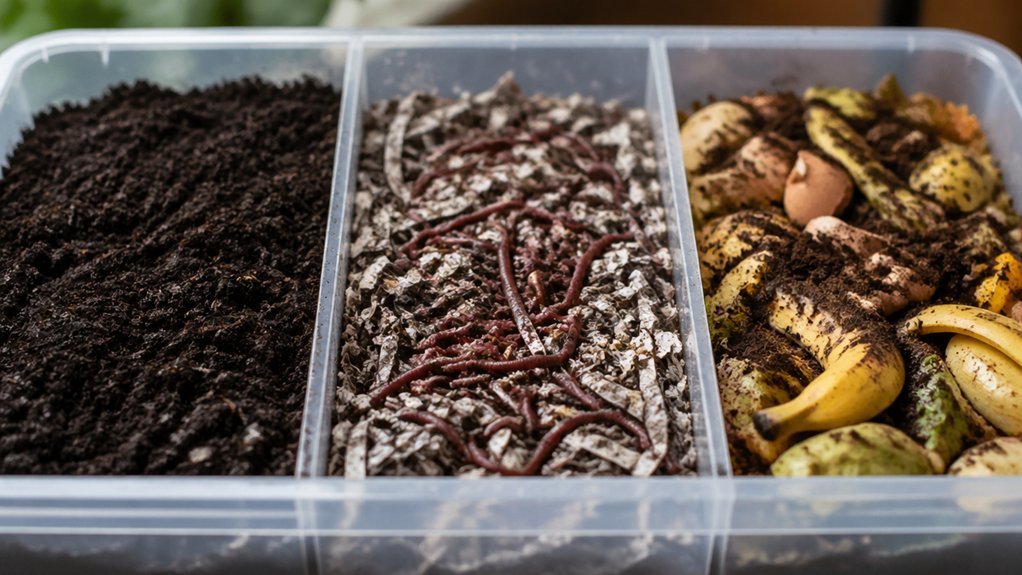
Space‑Efficient Vermicomposting
Ever wondered how to turn a cramped kitchen corner into a thriving worm farm? Vermicomposting fits tiny spaces perfectly. Pick a shallow, ventilated bin that slides onto a shelf or under a sink, and keep the temperature around 65‑70 °F. Feed in small batches of chopped greens and a modest amount of browns, aiming for a 1:1 to 3:1 browns‑to‑greens ratio. The mix should stay moist and crumbly, letting red wiggler worms work efficiently without odor.
- Use a closed, ventilated lid to contain smells while allowing airflow.
- Add shallow bedding layers to improve aeration and prevent compaction.
- Rotate the bin gently every few days to distribute moisture and food evenly.
These steps let you maintain a healthy vermicompost system in even the smallest nooks.
Gradual Transition Techniques
A smooth shift from a hot compost pile to a slow‑decomposing or vermicompost system starts with a 3:1 browns‑to‑greens mix for the first few batches, then gradually trims the greens while keeping the browns dominant as the temperature drops.
In a tiny kitchen you’ll use a two‑bin or stacked setup: move finished material into the worm bin and start new batches with 50–60 % browns and 40–50 % greens.
Reduce the greens‑to‑browns ratio each week, aiming for a browns‑heavy blend that keeps the bin cool and worm‑friendly.
Keep inputs modest—about 2–4 inches of chopped scraps weekly—so the worms aren’t overwhelmed.
If you notice ammonia, add more browns; if the mix feels soggy, cut back greens and increase the browns to greens ratio.
This steady adjustment lets you transition without a sudden odor spike or temperature shock.
Managing Moisture and Aeration
How do you keep a tiny compost system from turning into a soggy, smelly mess? Aim for a “damp sponge” feel—moist but not dripping. Check the mix daily; if it feels wet, toss in extra browns to soak up excess liquid. Aeration is your ally: turn or mix weekly, or choose a rotatable drum or dual‑bin design that forces air through the pile. Keep the greens‑to‑browns ratio near 50/50 and watch for ammonia smells—those mean too many greens and not enough airflow.
- Add shredded newspaper or cardboard as a brown absorbent.
- Use a small hand‑fork to fluff the material every 5‑7 days.
- Install a vented lid or perforated tray to boost aeration.
With these steps, you’ll maintain moisture balance and prevent foul odors while your compost breaks down efficiently.
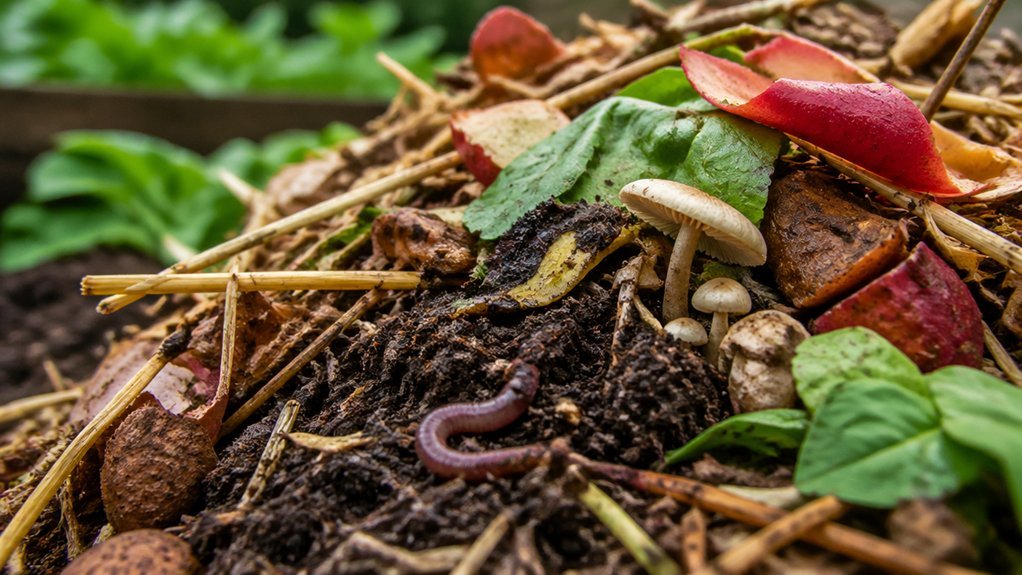
Testing Finished Compost for Small Gardens & Indoor Plants
What should you look for when you test finished compost for tiny gardens or indoor pots? You’ll want a dark, crumbly, soil‑like texture that smells lightly earthy—no ammonia or sour notes. Scoop a handful, squeeze gently; it should hold together but crumble easily. Run a finger through to feel a smooth, screened consistency, free of large fragments that could damage delicate roots.
For indoor plants, verify full maturity by checking for any lingering leachate; if present, dilute it with water before use to avoid nutrient shock.
When repotting, mix the compost at roughly a 1:4 ratio with potting soil, or top‑dress houseplants with a quarter‑inch layer. This guarantees improved structure, moisture retention, and balanced nutrients for your tiny space garden.
Common Ratio Mistakes in Tiny Spaces and Quick Fixes
Even after you’ve nailed the texture and smell of finished compost, the ratio you used to get there can still trip you up in a tiny space. The most common slip is treating a 1:1 browns‑to‑greens mix as a perfect C:N balance, when it actually leaves you with excess nitrogen and foul odors. You might also over‑load greens, thinking more nitrogen speeds up the process, but in a compact bin that just stalls decomposition. Finally, forgetting to chop inputs into bite‑size pieces makes the pile sluggish and weed‑prone.
- Use a 3:1 browns‑to‑greens ratio for a reliable C:N approximation.
- Add extra browns when you smell ammonia or see soggy spots.
- Chop all material into small pieces to keep the tiny pile active.
Frequently Asked Questions
How to Compost in Small Spaces?
You start by mixing browns and greens roughly 3‑to‑1 by volume, keep the pile moist but not soggy, chop materials small, turn it regularly, and use a compact tumbler or dual‑bin system for aeration.
What Is the Golden Ratio for Composting?
You’ll find the golden ratio is roughly three parts browns to one part greens by volume, giving you balanced moisture, aeration, and fast breakdown while keeping odors under control.
How Do the Amish Make Compost?
You’ll see Amish using simple bins or piles, layering yard waste with kitchen scraps, keeping browns and greens roughly equal, turning rarely, and letting nature do the work without any fancy additives.
What Is the Lazy Compost Method?
You follow the lazy compost method by mixing equal parts browns and greens, feeding small shredded scraps daily, keeping the pile as moist as a wrung‑out sponge, and aerating lightly with occasional gentle turns.
In Summary
Mastering a tiny‑space compost bin boils down to keeping the C:N ratio around 20‑30:1, layering browns and greens, and watching moisture so it stays damp, not soggy. Turn the pile or tend your worm bin often enough to keep temperature stable, and switch to slower or vermicomposting when space limits heat. Test the finished crumb for aroma and texture before using it in your indoor garden, and you’ll enjoy rich, waste‑free soil without a mess.
Leave a Reply