
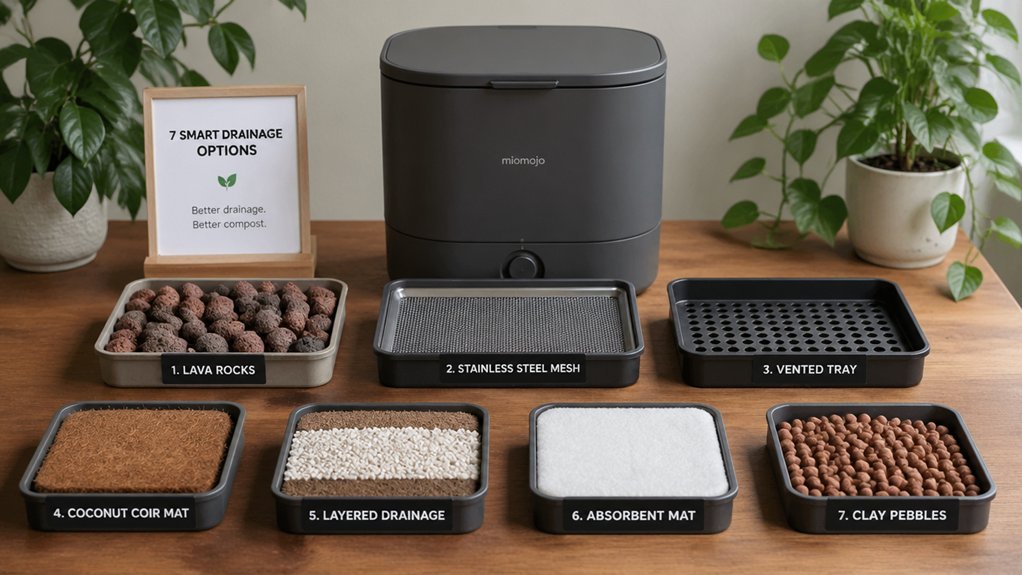
You’ll keep your kitchen floor dry and odors at bay by using a simple tray or shallow basin as the drainage base, then add a thin perlite or vermiculite layer for rapid absorption. Line the bottom with coffee filters or cheesecloth to stop clogs, and insert a DIY grid of recycled bottles or packing peanuts to channel liquid. Build a double‑compartment bin with a separate leachate tray, seal the base, and install a small pump for continuous removal. The next steps will show you how to fine‑tune each solution.
Why Proper Drainage Matters for Indoor Composters

Why does proper drainage matter for indoor composters? You need effective drainage to keep leachate from pooling and causing odor, plant damage, or pathogen spread. When moisture builds up, ammonia and nitrates dissolve into the leachate, and without a clear pathway they seep onto countertops or floors, contaminating nearby plants and workspaces. Proper drainage holes and channels move liquid away quickly, preventing anaerobic pockets that generate foul smells. You’ll also avoid clogging, which can trap leachate and increase runoff. replaceable charcoal filters can aid in odor control while maintaining airflow to reduce moisture buildup.
Pick a Simple Tray or Shallow Basin as Your Drainage Base
Pick a tray that’s big enough to catch all the runoff, and make sure its lip or edge is wide enough to hold the liquid without spilling. Choose a waterproof material like heavy‑duty plastic or enamel‑coated metal so cleaning is a breeze. Adding a thin absorbent layer underneath can help mop up any stray drops and keep your floor dry. The tray should be sized to accommodate the specific compost bin you choose, whether it’s a compact countertop model or a larger outdoor dual‑chamber system with ongoing aeration. charcoal filter and odor control considerations can guide your choice of bin, which in turn affects how much runoff you’ll need to manage.
Choose Size Wisely
How much leachate will your composter produce between emptyings? Estimate the volume and pick a drainage base that holds it comfortably. A shallow basin that’s too small will overflow, soaking the floor and defeating leachate containment. Measure the tray’s length, width, and depth; aim for at least 25 % extra capacity beyond your projected output. If you run multiple bins, add a margin for simultaneous leaks. Choose a smooth‑sided tray that slides easily under the composter and can be lifted for cleaning. Place it on a level surface, and consider a protective sheet underneath to catch stray drips. By sizing the base correctly, you prevent pooling, keep the area dry, and simplify routine leachate disposal. Leak prevention can also be aided by selecting trays with easy emptying features and durable materials.
Ensure Proper Lip
A shallow basin or simple tray with a raised lip sits directly under the composter, catching leachate before it can spread across the floor. Choose a tray made of easy‑to‑clean plastic and a removable bottom so you can empty it without hassle. The lip should be high enough to contain spills and wide enough to guide liquid toward the drainage holes you’ll drill or purchase. Position the assembly on a waterproof mat, tarp, or washable cardboard to protect the floor. If you anticipate larger volumes, consider a two‑layer system: a shallow basin under the unit, then a secondary tray that channels overflow toward an external drain or absorbent layer. This setup keeps moisture confined, simplifies cleaning, and prevents water damage. For added durability, ensure the system uses materials with good humidity resistance and a hermetically sealed design to minimize fogging and leaks drainage considerations.
Add Absorbent Layer
Ever wondered how a simple tray or shallow basin can turn a messy leachate problem into a clean, manageable system? Place a shallow basin right under your indoor composter and line it with an absorbent layer—shredded cardboard, sawdust, or pine chips work great. The layer soaks up leachate before it reaches the floor, reducing odor and preventing puddles. As the liquid is absorbed, it turns into manageable runoff you can safely dispose of or reuse as compost tea. Keep the layer thick enough to slow drainage, but not so deep that it blocks airflow. Inspect it weekly; replace any soggy sections to avoid anaerobic pockets and maintain healthy airflow around the composting mass. This simple setup keeps your kitchen tidy and your compost thriving. absorbent layer helps manage moisture without compromising airflow.
Add a Perlite or Vermiculite Layer for Fast Absorption
You’ll notice that a thin layer of perlite or vermiculite instantly so up excess moisture while keeping the compost airy. Moisture readings can help you monitor how this layer affects the system, ensuring you maintain optimal moisture balance over time.
Rapid Water Retention
By adding a thin layer of perlite or vermiculite right over the drainage base, you create an instant wicking zone that pulls excess moisture away from the compost mass. This rapid water retention strategy works because perlite’s 3–6 mm particles and high porosity act like a sponge, absorbing spills and then releasing them slowly into the underlying coarse drainage. Vermiculite, being more water‑retentive, holds moisture near the base while still allowing flow, preventing dry spots. Distribute the layer evenly to avoid channeling and keep the compost’s moisture balanced. The combination of a coarse bottom layer and a light top layer ensures that any added water is quickly captured, stored, and gradually released, maintaining optimal drainage and moisture levels for healthy composting. Moisture control supports consistent decomposition pace and helps maintain odor control and air quality in indoor bins.
Enhanced Aeration Efficiency
How can you boost airflow while keeping moisture in check? Adding a thin perlite or vermiculite layer creates a breathable cushion that stops compaction and speeds oxygen flow. Choose 3–6 mm perlite for its lightweight porosity, or coarser vermiculite that expands when wet, holding just enough moisture for microbes. Alternate the mineral layer with carbon‑rich browns to keep the mix loose and odor‑free.
- Spread 1‑2 cm of perlite on the compost’s base.
- Top with a 1‑cm vermiculite sheet for moisture balance.
- Intermix brown material every few centimeters.
- Check for clumps weekly and break them up.
This simple structure maximizes aeration, reduces anaerobic pockets, and keeps your indoor composter healthy.
Simple Layer Integration
A thin sheet of perlite or vermiculite placed at the bottom of your indoor composter creates an instant, fast‑absorbing drainage layer that pulls excess moisture away while keeping the mix airy.
You spread a 1‑2‑inch blanket of perlite, then add a light layer of vermiculite if you want extra moisture‑wicking.
The porous particles prevent compaction, so leachate channels straight out of the compost mass instead of pooling in anaerobic pockets.
Because both materials are inert and lightweight, they won’t alter the nutrient balance, yet they dramatically boost aeration and water movement.
Simply tap the layer level, then stack your organic mix on top; the perlite‑drainage layer will keep the system dry, breathable, and ready for rapid decomposition.
Insert a DIY Grid of Recycled Bottles or Packing Peanuts
A simple DIY grid of recycled PET bottles or loose packing peanuts creates a light, permeable drainage layer beneath your indoor compost bin, guiding leachate away while preventing clogs.
You can cut bottles in half, stack them with their necks facing up, and leave gaps so water flows through vertical channels.
Or toss a handful of clean packing peanuts, letting them interlock to form a porous cushion that won’t compact.
Secure the grid above any bottom holes and place it on a tarp to channel liquid to a collection tray.
- Use PET bottles for rigid, tall channels.
- Choose packing peanuts for flexible, bulk porosity.
- Keep the grid level to avoid pooling.
- Ensure the grid sits just above the bin’s base.
Line the Bottom With Coffee Filters or Cheesecloth to Prevent Clogging
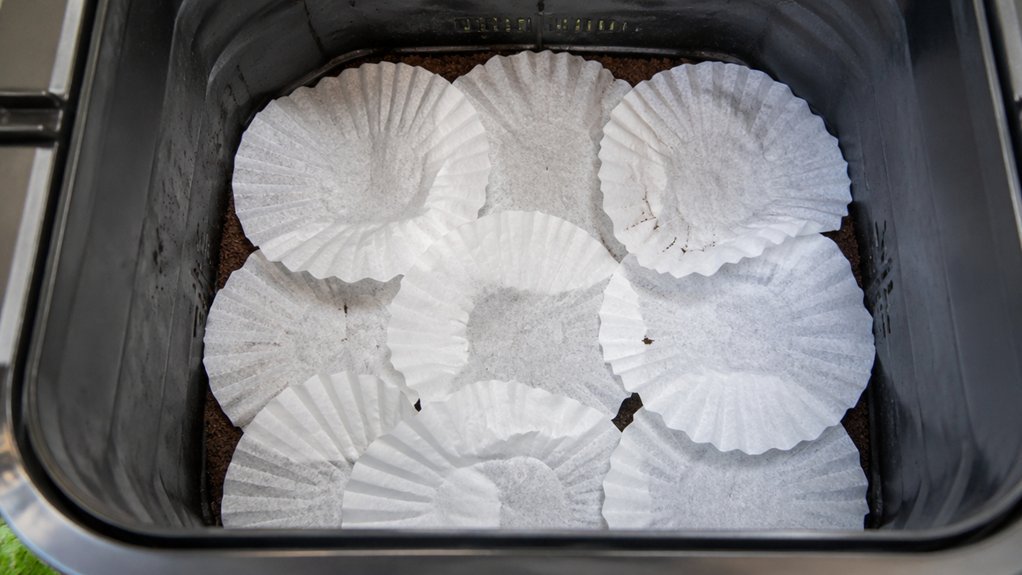
Ever considered lining your composter’s base with coffee filters or cheesecloth? You’ll trap soil and fines before they reach the drainage holes, cutting clog risk dramatically. Coffee filters work great in planters with holes—soil stays contained while water slips through, boosting drainage efficiency. If you need a finer barrier, cheesecloth catches even the smallest particles yet still lets leachate flow toward the pipe. Pair either liner with perlite, vermiculite, or pea‑gravel to keep solids out of the channels. When you empty or rinse the bin, inspect the fabric and replace it if it’s clogged or torn. Regular checks keep the system unobstructed, ensuring your indoor composter stays dry and odor‑free.
Build a Double‑Compartment Bin With a Separate Leachate Tray
Looking to keep leachate from soaking your kitchen floor while still harvesting nutrient‑rich liquid? Build a double‑compartment bin that isolates the compost pile from a dedicated leachate tray. The lower tray acts as a containment basin, catching runoff so you can drain or evaporate it safely. Removable panels let you access the finished‑compost section without disturbing the main pile, and a forklift‑friendly stand lets you roll the whole unit for cleaning or transport.
- Choose a sturdy tray that fits snugly under the bin.
- Seal the interface between compartments to prevent leaks.
- Install a removable liner for easy leachate disposal.
- Add access panels for quick cleaning and monitoring.
Seal the Base and Install a Small Pump for Continuous Leachate Removal
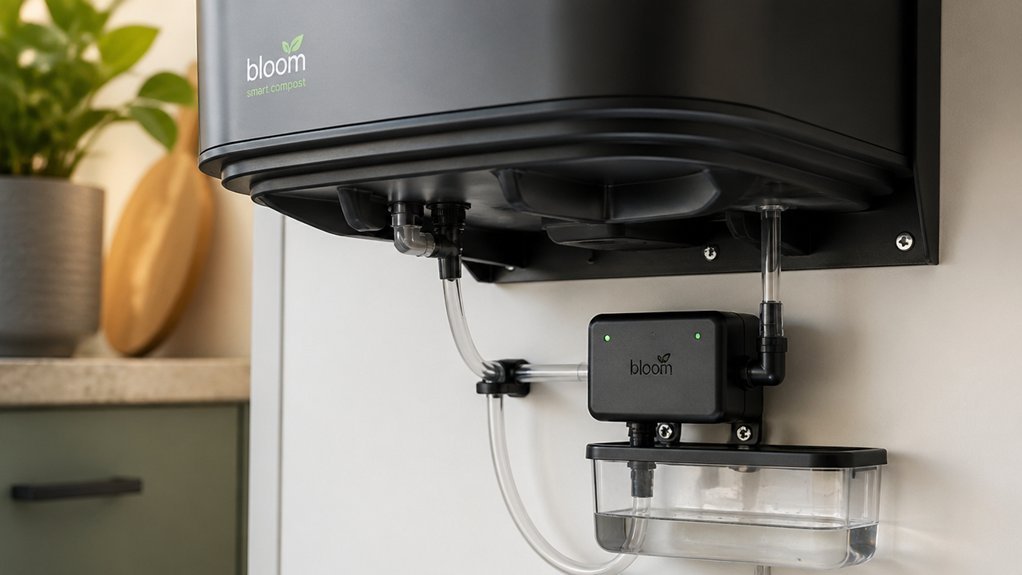
How can you keep leachate from seeping into your kitchen while ensuring it’s removed continuously?
First, apply a waterproof sealant around the compost base, covering every seam and corner. Then, attach a compact pump system sized for your bin count—if you run eight bins, choose a pump that handles the higher daily flow. Run a dedicated drainage line from the sealed base to an exterior exit or an absorbent underlayment, directing leachate away from living spaces. Place a vented secondary containment tray beneath the pump to catch overflow or failures, reducing odors. Finally, check the pump’s operation and seal integrity weekly; consistent monitoring prevents buildup and guarantees continuous leachate removal.
Frequently Asked Questions
How to Keep an Indoor Compost Bin Dry?
Keep your bin dry by adding carbon‑rich dry material when it feels soggy, turning regularly for aeration, and placing it on a tray or tarp that catches any leachate before it pools.
What Is Best to Put in the Bottom of a Compost Bin?
You should line the bin’s bottom with a layer of coarse gravel or pea‑gravel, then add a coffee‑filter or cheesecloth barrier, and top it with a thin sheet of packing material to regulate drainage.
What Three Items Should Not Be Placed in a Compost Pile?
You shouldn’t add meat, dairy, or oily foods; citrus peels or onions in large amounts; and pet waste or litter. These attract pests, upset microbial balance, and introduce pathogens or odors.
Do Compost Bins Need Drainage Holes?
Yes, you should include drainage holes. They let excess moisture escape, preventing soggy, odor‑producing conditions. Pair them with a tray or barrier to catch runoff, keeping your space clean and odor‑free.
In Summary
By mastering drainage, you keep your indoor composter odor‑free, hygienic, and efficient. A simple tray, a porous layer, and a DIY grid let excess moisture flow away quickly. Coffee‑filter or cheesecloth liners stop clogs, while a double‑compartment design catches leachate for easy disposal. Seal the base and add a tiny pump for continuous removal, and you’ll enjoy a clean, thriving compost system that fits snugly in any room.

Leave a Reply