
You can transform your compost bin into an efficient decomposition system by implementing seven proven ventilation strategies. Start by understanding whether you’re doing hot, passive, or winter composting—each requires different airflow approaches. Install vertical PVC pipes to reach your pile’s core, layer coarse materials for natural air pockets, and drill ventilation holes in enclosed bins. Build internal structure with sticks and stalks, turn regularly to reintroduce oxygen, and combine methods tailored to your specific setup. Discover which techniques will revolutionize your composting success.
Understand Your Composting Style: Hot, Passive, or Winter
Why does your composting style matter for ventilation? Your chosen method directly determines how much airflow you’ll need to maintain.
Hot composting demands the most active ventilation strategy. You’ll turn your pile regularly to sustain temperatures between 100°F and 140°F, keeping microbial activity high. This requires at least one cubic yard of material and careful carbon-to-nitrogen balance.
Passive composting requires minimal intervention. You’ll build your pile with coarse bulking materials that naturally support convective airflow, then let decomposition proceed slowly over three to six months without turning. For smaller spaces, countertop compost bins can serve as a practical alternative to traditional outdoor piles while maintaining similar passive principles.
Winter composting falls somewhere between. You’ll balance heat retention with airflow by insulating your pile with tarps or leaves while maintaining adequate pore space for oxygen movement. When temperatures drop below 55°F, worms slow or stop eating, so proper ventilation becomes even more critical to support the microbial decomposition processes that sustain your pile during cold months.
Match your style to your goals: active management for speed, passive for simplicity, or insulated methods for cold months.
Install Vertical PVC Pipes to Aerate Your Pile’s Core
Once you’ve settled on your composting style, you can select ventilation methods that match your approach. Vertical PVC pipes are an excellent passive aeration solution that delivers oxygen directly to your pile’s core without requiring fans or forced airflow.
Vertical PVC pipes offer passive aeration that delivers oxygen directly to your compost pile’s core without fans or forced airflow.
Here’s what makes this system effective:
- Use large-diameter pipes (4 inches) placed vertically during bin filling so surrounding material stabilizes them as the compost settles.
- Drill perforations along multiple sides spaced several inches apart to allow oxygen exchange into the surrounding compost mass.
- Distribute multiple pipes across the bin rather than clustering them, extending them close to the bottom to reach the least oxygenated layers. For a three-bin setup with an active bin, carbon storage bin, and nitrogen storage bin, you can install 10 sections of perforated PVC pipe horizontally to improve both aeration and cooking speed across your entire composting system.
This setup supports faster, hotter decomposition by keeping aerobic microbes active and preventing anaerobic conditions in deeper bins. Proper aeration through ventilation systems works similarly to how charcoal filters in indoor compost crocks control odors by promoting oxygen flow and reducing decomposition byproducts.
Layer Coarse Materials for Natural Air Pockets
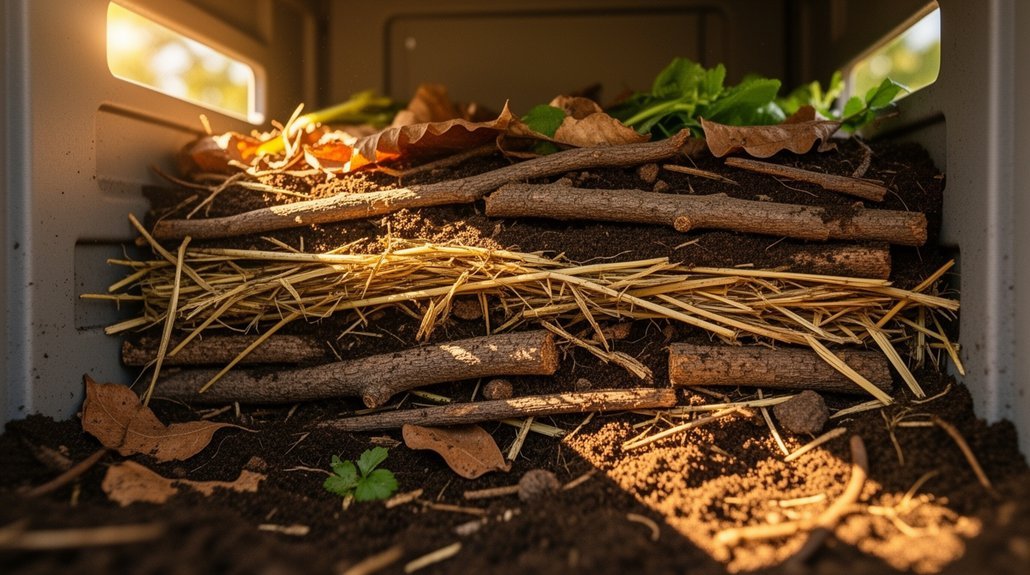
How can you maintain consistent airflow without installing pipes or equipment? You’ll create natural air channels by layering coarse materials at your bin’s bottom. Start with 4–6 inches of small branches, twigs, or chopped stalks positioned directly on soil or the bin floor. These materials establish open spaces that allow oxygen to penetrate your pile’s center, supporting aerobic decomposition.
Beyond aeration, this coarse foundation prevents water from pooling at the base, reducing anaerobic conditions and odors. The structural layer also minimizes settling as you add compost layers above it.
Consider criss-crossing long sticks for maximum open space, or use straw, bark, and crushed garden stalks. Avoid fine materials dominating your base layer. This simple foundation approach accelerates decomposition while keeping your pile properly drained and oxygenated. Models with deep fins in their design similarly enhance oxygen circulation through multiple vents. When turning a regularly managed bin, expect twigs to distribute throughout, which may aid circulation but will increase the physical effort required during the turning process.
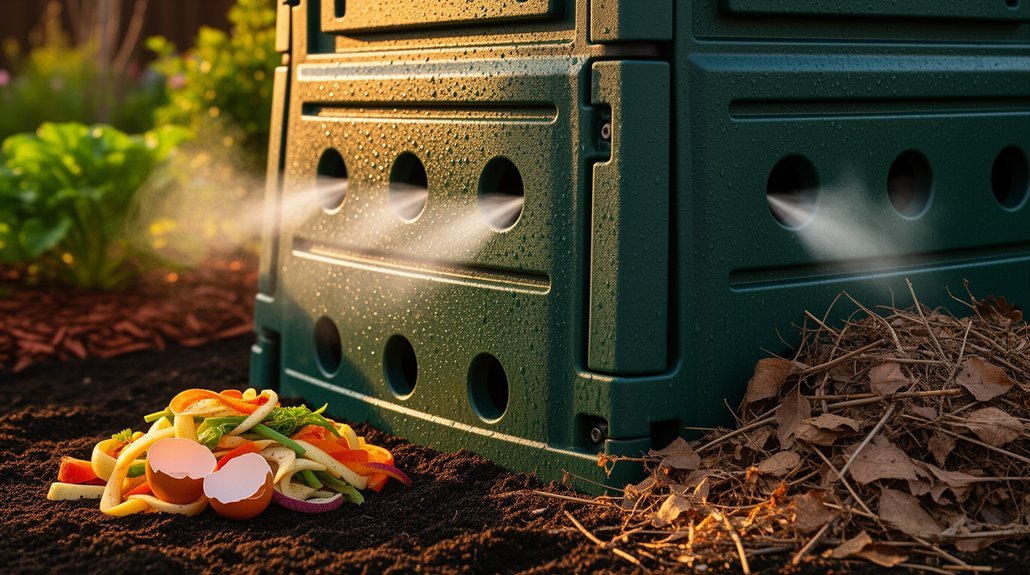
Add Ventilation Holes to Enclosed Compost Bins
You’ll want to drill holes strategically throughout your enclosed bin, spacing them every 4 to 6 inches to maintain consistent airflow without letting compost spill out.
Size matters too—aim for roughly 1/2-inch openings, since anything smaller than 1/4 inch won’t effectively move air.
Prioritize placing holes along the bottom for drainage and soil organism entry, then distribute additional vents along the sidewalls to exchange stale interior air with fresh oxygen. This aeration supports aerobic microbes that decompose materials efficiently while preventing the slower, odor-producing anaerobic conditions that develop in airtight bins. Larger hole sizes also promote better heat retention and faster decomposition, aiding consistent air circulation throughout your compost pile.
Drill Holes Strategically
Why do enclosed compost bins trap stale air when they’re sealed tight? You’re creating anaerobic conditions that breed foul odors and slow decomposition. Strategic hole placement transforms your bin’s airflow dramatically.
Position your holes thoughtfully:
- Side vents allow fresh air entry and stale air escape, preventing compaction in the middle layers
- Lower section holes target the bottom where materials compress most, improving oxygen distribution throughout
- Top ventilation releases excess heat and moisture from your active core
You’ll want holes distributed across the bin’s full mass, not just the surface. Consider pairing drilled holes with internal aeration aids like perforated PVC pipes or sturdy sticks. This combination creates air channels that penetrate deep into dense compost, ensuring consistent oxygen availability where you need it most. Maintaining proper ventilation design with aeration holes promotes steady airflow essential for decomposition. Bacteria need air to function effectively and break down the organic materials in your bin into finished compost.
Size And Spacing Matters
Now that you’ve decided where to place your holes, the actual dimensions of those openings become your next consideration. You’ll want to balance aeration with moisture retention, so hole size directly impacts your bin’s performance.
| Bin Type | Hole Diameter | Spacing |
|---|---|---|
| Small enclosed | 1/4 to 1/2 inch | 10×10 inches |
| Medium bins | 1/4 to 3/8 inch | Variable |
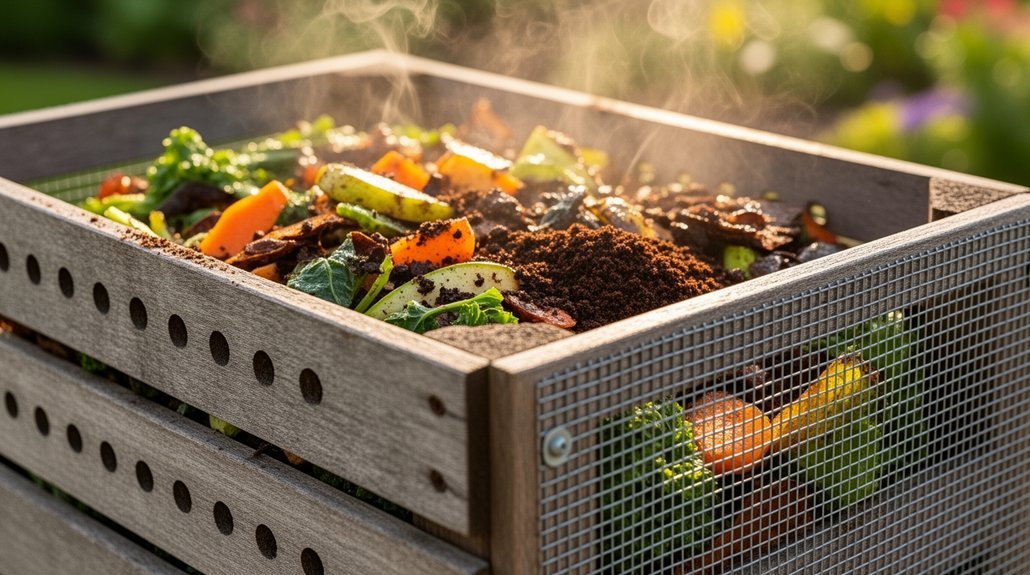
| Large wire-mesh | 1/2 to 1 inch | 4 inches apart |
| Perforated pipe | 3/8 inch | 4 inches apart |
You should distribute holes evenly across multiple levels to maintain oxygen circulation throughout your compost mass. Smaller openings reduce excessive drying while larger ones increase airflow but risk releasing heat and moisture. Closely grouped openings improve circulation, though uneven distribution creates compacted, low-oxygen zones you’ll want to avoid. Layering waste with moisture control aids helps prevent soggy scraps that slow microbial activity and fermentation efficiency. Adequate airflow prevents foul anaerobic odors and ensures that your decomposition process remains efficient and odor-controlled.
Bottom And Side Placement
Where should you place ventilation holes in an enclosed compost bin? Strategic placement of bottom and side vents addresses your two critical composting needs: drainage and oxygen flow.
- Bottom holes – Position perforations along the base to enable moisture escape and allow oxygen penetration into lower, compacted layers. This prevents anaerobic conditions that cause odors.
- Side vents – Distribute holes around the walls to promote cross-ventilation throughout the bin’s full structure. This keeps decomposition aerobic and prevents soggy pockets.
- Elevated placement – Raise your bin off wet ground to improve natural drainage and reduce moisture accumulation. However, the specific wall design you choose is less critical than maintaining moisture and oxygen levels within acceptable ranges for successful decomposition. Consider using recyclable paper material as a base layer to help manage moisture while supporting aerobic conditions.
Together, these openings maintain the balance your compost needs. Without both bottom and side ventilation, you’ll face stagnation, excess moisture, and slow decomposition—problems requiring frequent turning to compensate.
Use Sticks and Stalks to Build Internal Structure
How can you improve airflow without investing in mechanical aeration? You can strategically place upright sticks and branches inside your bin to create internal air passages. Position fallen branches, sunflower stalks, or sturdy twigs vertically to function like an internal framework that channels oxygen through dense material. This approach prevents anaerobic conditions and works especially well during winter when you’d rather avoid turning the pile.
For a more elaborate structure, you can weave slimmer twigs between vertical stakes to create a wattle-style framework. This woven design holds your compost while maintaining ventilation through the sides, using locally available branch material. Consider weaving vines in and out to dress up the interior while improving structural integrity. Tools like aerator tools can complement this passive approach for enhanced air circulation during active composting seasons.
Balance your woody additions with nitrogen-rich materials like kitchen scraps and fresh greens. Excess sticks may slow decomposition, so use them purposefully to support airflow without overwhelming your pile’s composting balance.
Turn Your Pile Regularly to Reintroduce Oxygen

When you’re maintaining a hot compost pile, you’ll need to turn it frequently to keep oxygen flowing and microbes active.
Breaking up matted, compacted zones during each turn ensures air reaches the pile’s interior, where decomposition slows without proper aeration. Sufficient oxygen maintains active microbial metabolism during the decomposition process, which is why consistent turning is so important for hot piles.
Your turning schedule should shift with the seasons—more frequent turns during warm months when microbial activity peaks, and less often when temperatures drop and decomposition naturally slows. For indoor compost bins with limited ventilation, consider supplementing regular turning with activated charcoal filters to manage odors while aeration improves.
Hot Composting Requires Frequent Turning
Why does your compost pile heat up so quickly, then start to cool down? When you’re actively hot composting, oxygen depletion drives the temperature spike. As microbes rapidly consume oxygen, your pile signals it needs turning—typically around 160°F.
Frequent turning reintroduces oxygen and maintains thermophilic conditions for faster decomposition. Here’s what works:
- Turn every 2–5 days for continuous high-temperature composting
- Aim for weekly turning as a practical compromise between speed and labor
- Expect slower decomposition and earlier cooling if you turn less frequently
Smaller piles require more frequent turning since oxygen depletes faster. Once most material decomposes, you can reduce turning frequency. Actinobacteria appearance can serve as a visual indicator that your pile needs additional turning to restore aerobic conditions. Consider organizing your composting materials with airtight storage containers to keep dry ingredients like carbon-rich materials fresh and ready for layering into your pile. By staying responsive to temperature signals, you’ll keep your pile hot, active, and efficiently breaking down organic matter.
Breaking Up Matted Zones
After a few weeks of composting, you’ll likely notice dense, flattened layers where wet greens and kitchen scraps have pressed together into felt-like mats. These compacted zones restrict oxygen movement, slowing decomposition and creating anaerobic pockets that smell sour or swampy.
Breaking up matted areas is essential. Use a fork or shovel to turn your pile regularly, separating clumped material into smaller, airier pieces. Move outer material toward the center to expose compacted zones to active microbial activity. This disruption increases surface area, allowing microbes faster access while redistributing moisture throughout. As you turn, monitor your pile’s temperature—it should reach 130°F–140°F during active decomposition to indicate that beneficial microorganisms are thriving in the oxygen-rich environment you’ve created.
A full pile remix works better than simply fluffing the top layer. Regular turning reintroduces oxygen to your pile’s core, where oxygen-loving microbes thrive. You’ll maintain faster decomposition, prevent waterlogging, reduce odors, and achieve even heating without relying on equipment or additives alone.
Turning Schedules For Different Seasons
How often should you turn your pile? The answer depends on your season and goals. Temperature-based turning beats rigid schedules because it responds to your pile’s actual activity level.
- Spring: Turn every 2–3 weeks while adding kitchen scraps regularly. Warmer temperatures boost microbial activity, and consistent management gets you finished compost by mid-to-late summer.
- Summer: Weekly turning works best since heat accelerates breakdown. Monitor moisture carefully—high temperatures dry piles faster, so you’ll need to adjust watering accordingly. Reintroducing oxygen through more frequent turning during summer’s peak heat ensures aerobic microbes remain active and efficient.
- Winter: Turn less frequently since cooler conditions slow decomposition dramatically. Check temperatures before turning; if your pile stays cold, less frequent mixing is acceptable.
Watch for temperature drops as your signal to turn. When heat levels off, aerobic microbes need fresh oxygen to stay active.
Combine Methods: What Works Best for Your Bin
Since no single venting method works perfectly for every setup, combining techniques tailored to your bin style and composting goals will help you manage airflow more effectively. Small bins work best with layering and occasional turning since material compacts quickly. Large bins benefit from staged bays plus regular turning or passive aeration through structure. If your compost becomes dense or wet, add more browns and increase turning frequency to restore airflow. For hot composting systems, balance greens and browns carefully—poor ventilation creates slimy, oxygen-starved material. Consider pairing bokashi pre-treatment with your bin for faster aerobic breakdown, or supplement with leaf mold when nitrogen inputs are limited. Your specific combination depends on your bin type, climate, and available time. Using a compost aerator tool to lift and inspect deeper layers introduces surface area for bacteria and drives initial decomposition.
Frequently Asked Questions
How Often Should I Check My Compost Bin’s Ventilation System for Clogs or Blockages?
You should check your bin’s ventilation every time you add material, weekly during regular mixing, and immediately after heavy rain or wet inputs. Inspect more often if you notice sour smells or slimy texture.
Can I Use PVC Pipes in Small Apartment Balcony Compost Containers Effectively?
Yes, you can effectively use PVC pipes in small apartment balcony containers. You’ll need to balance aeration with proper moisture control, add sufficient browns to absorb moisture, and manage your kitchen scraps volume carefully for success.
What’s the Ideal Diameter for Drilled Holes in Perforated PVC Vent Pipes?
You’ll want to drill 1/4-inch holes in your PVC pipe for optimal aeration. This size balances airflow with structural strength, reducing clogging while maintaining adequate air pressure throughout your compost pile.
How Do I Know if My Compost Pile Has Become Too Compacted to Aerate?
You’ll know your pile’s too compacted when you insert a pitchfork and feel strong resistance, notice dense, matted texture, detect foul odors, or see slow decomposition despite adequate moisture levels.
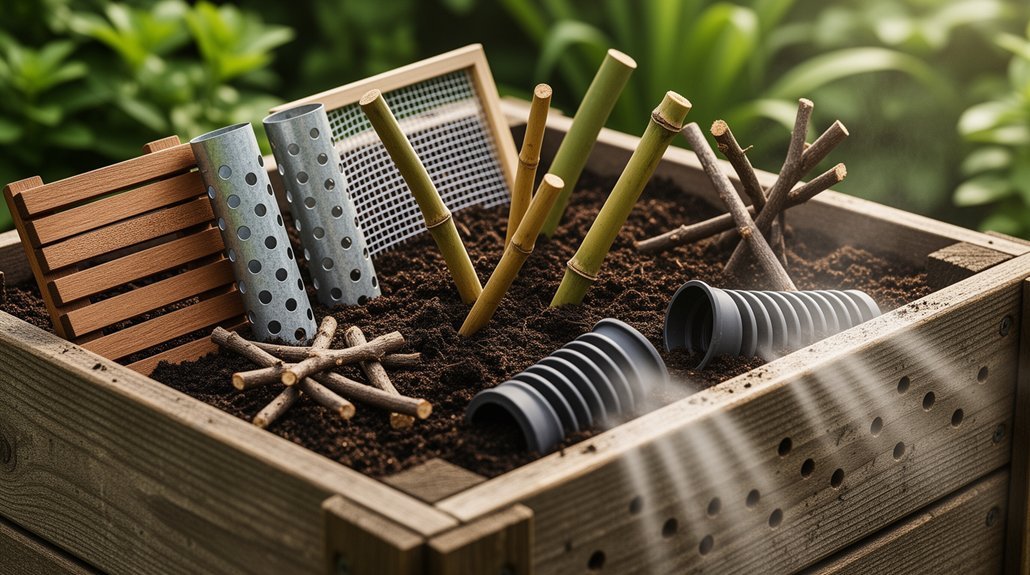
Are There Sustainable Alternatives to PVC Piping for Vertical Compost Bin Ventilation?
You can build vertical channels with bundled sticks, cornstalks, or bamboo. You’ll also find durable alternatives like metal pipe, ceramic pipe, or flexible polyethylene drain pipe that you can reuse between batches.
In Summary
You’ve got plenty of options to keep your compost bin properly ventilated. Whether you’re running a hot system, maintaining a passive pile, or composting through winter, you’ll find a method that suits your needs. Mix and match these techniques—add those PVC pipes, layer coarse materials, drill ventilation holes, and turn regularly. You’ll notice faster decomposition and fewer odor problems when you’re actively managing airflow through your compost.


Leave a Reply