
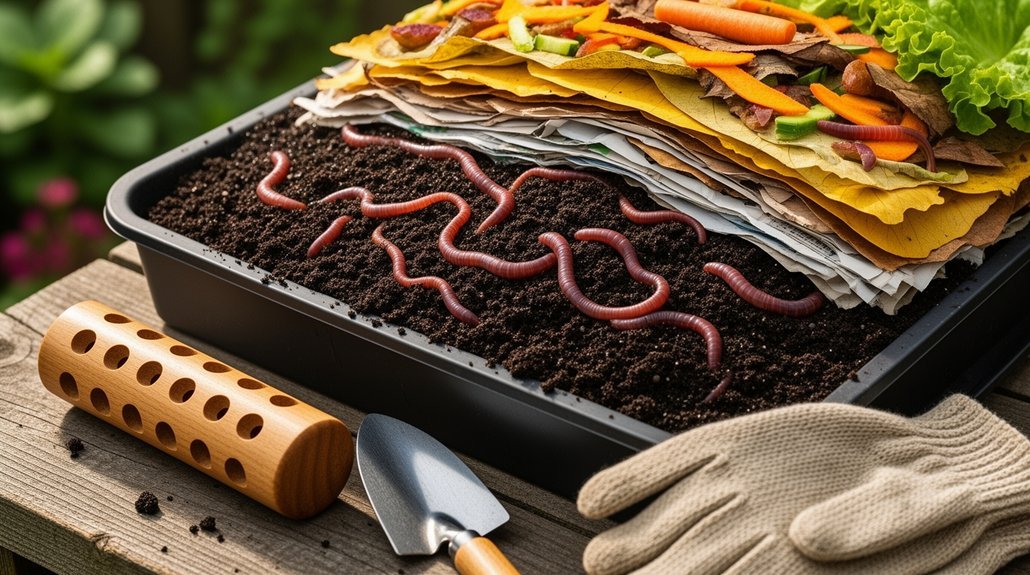
You can transform your vermicompost bin by drilling ventilation holes near the top and bottom, using wire mesh screening, and starting with loose, carbon-rich bedding like shredded cardboard. Maintain a 2:1 bedding-to-food ratio, feed small amounts weekly, and always cover scraps with dry materials. Loosen compacted sections every few weeks and monitor weekly for moisture and odor issues. These foundational techniques’ll keep your bin thriving—discover how to refine each method for maximum results.
Drill Ventilation Holes for Better Airflow
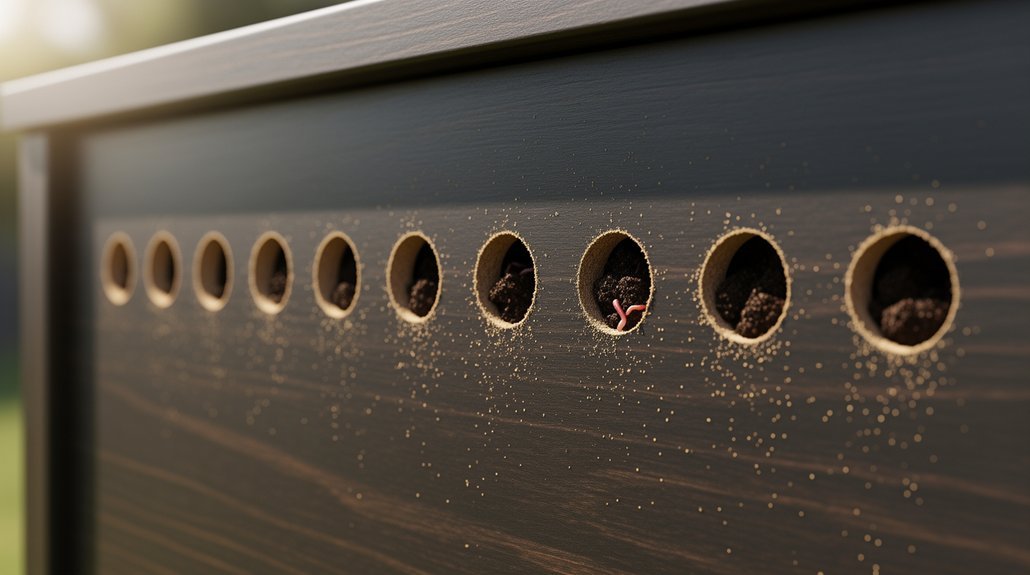
Because worms breathe through their skin, they’ll suffocate without adequate oxygen in your bin. Drilling ventilation holes is the most effective way to maintain continuous airflow.
Use a 1/8-inch drill bit to create holes near the top rim, about 1 inch from the edge. This placement keeps bedding contained while maximizing oxygen exchange. Drill 18 evenly spaced holes on each long side and 8 holes in each end for consistent circulation.
Don’t forget the bottom. Install approximately 12 quarter-inch drainage holes to prevent excess moisture from pooling and creating anaerobic conditions. Check internal ridges too, as liquid can collect there. For enhanced moisture management, consider adding a false bottom with shredded cardboard to support airflow and absorb excess liquids before they accumulate. Proper drainage systems also support continuous decomposition by funnel bokashi tea downward through connected materials.
After drilling, clean away any plastic burrs. Proper ventilation prevents foul odors, keeps your worms active, and maintains healthy decomposition throughout your bin.
Use Screening to Block Pests and Prevent Escapes
How can you keep unwanted pests out while preventing your worms from escaping? Strategic screening solves both problems simultaneously.
Install 1/4″ wire mesh on your bin’s bottom to block rodents from burrowing underneath. For smaller pests, use vermin mesh with 2mm thick wire—tight enough that baby rodents can’t squeeze through. Ensure the mesh fits snugly against your bin for maximum effectiveness.
When harvesting castings, use appropriately sized screens to separate worms and cocoons from finished compost. A 1/8″ sifter works well for red wigglers, while 1/4″ screens handle European nightcrawlers. Finer 1/12″ mesh removes nearly everything except finished castings. Position your vermicompost bin somewhere convenient in the garden to streamline your scraps disposal routine. Removable inner buckets make it easier to transport materials between your vermicompost bin and screening station.
Combine screening with other protective measures: use fully enclosed bins with tight-fitting lids, place bins on cement slabs, and seal cracks with wire mesh to create a comprehensive pest defense system.
Start With Loose, Carbon-Rich Bedding
While screening keeps pests and worms contained, what happens inside your bin matters just as much—and it all starts with your foundation layer. You’ll want to build that foundation with loose, carbon-rich bedding that creates air pockets and lets oxygen flow freely through your bin.
Shredded cardboard is your go-to choice because it’s easy to find and stays fluffy. You can also mix in shredded paper, fall leaves, or straw for added bulk and airflow. Skip dense materials alone—they’ll compact and suffocate your bin. Instead, combine bulky bedding with finer materials like coir or peat moss to balance moisture retention and aeration. Diverse bedding mixtures increase your chances of maintaining a stable, resilient bin ecosystem compared to relying on a single bedding source.
Moisten your cardboard before adding it, and keep replacing bedding as it breaks down. This maintains the pore space your worms need to thrive. Proper sizing and fit of your bedding components—similar to how bucket liner dimensions affect composting performance—ensures optimal airflow and prevents compaction that can compromise your vermicompost system.
Add Bulky Materials to Maintain Pore Space
You’ll want to incorporate bulky materials like wood chips and coarse plant matter into your bin to keep the bedding structure intact. These materials resist settling and matting, which preserves the air channels your worms need to thrive. Since worms breathe through their skin, maintaining adequate aerobic conditions with proper ventilation and pore space is essential for their survival and activity in the bin. For optimal organization of your composting supplies and materials, consider using multi-compartment sorters to categorize different types of bulky materials and bedding components.
Wood Chips for Structure
Wood chips maintain the pore space your vermicompost bin needs to stay aerobic and functional. They serve as a structural bedding material that prevents compaction while you’re adding food scraps and manure.
However, you’ll get better results if you age or pre-compost fresh wood chips before adding them to your worm beds. This approach reduces the risk of excess heating and moves the material closer to a worm-friendly carbon-to-nitrogen balance. Screen out the partially decomposed chips after processing to remove resistant material and recycle it as a bulking agent for future batches.
Keep chips smaller than two inches for faster breakdown, and prefer hardwood varieties over softwoods, which can contain oils that inhibit decomposition. Mix your chips with nitrogen-rich materials like food waste or manure to accelerate decomposition. Store partially decomposed materials in airtight containers to maintain optimal moisture levels during the aging process. This combined approach works particularly well in larger outdoor systems, where you can later screen out and recycle the partially decomposed chips.
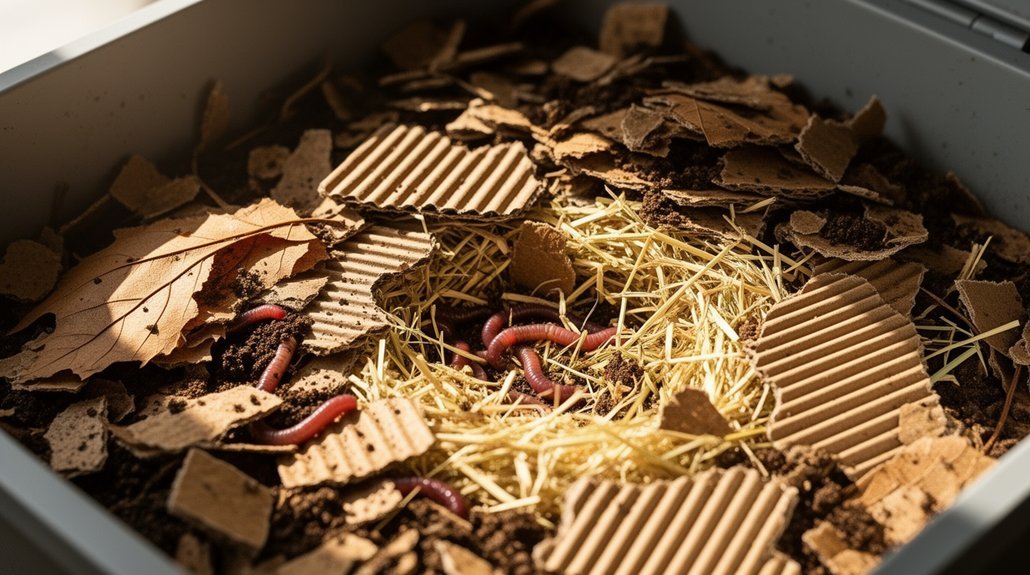
Coarse Materials Prevent Compaction
Pore space doesn’t maintain itself once you’ve filled your bin, so you’ll need to actively manage compaction through your bedding choices. Coarse, bulky materials preserve the air channels that worms need to thrive. Shredded cardboard maintains its rigid texture as it breaks down, keeping pathways open. Scrunched paper and pulled-apart corrugated cardboard create irregular voids that resist matting. Chopped leaves add structure without disappearing too quickly, supporting long-term porosity. When you combine these materials—mixing cardboard with coco coir and leaves—you create varied particle sizes that naturally resist compression. To optimize this effect, aim to include 70%–80% safe habitat materials in your total system volume, which ensures adequate bedding throughout all zones. Materials with strategically placed air vents or perforations can further enhance oxygen distribution when layered into your bedding system. Avoid tightly packing thin, flat materials, which collapse easily. Instead, layer bulkier, fibrous bedding that stays loose over time, ensuring consistent airflow throughout your system.
Balance Bedding and Food in a 2:1 Mix
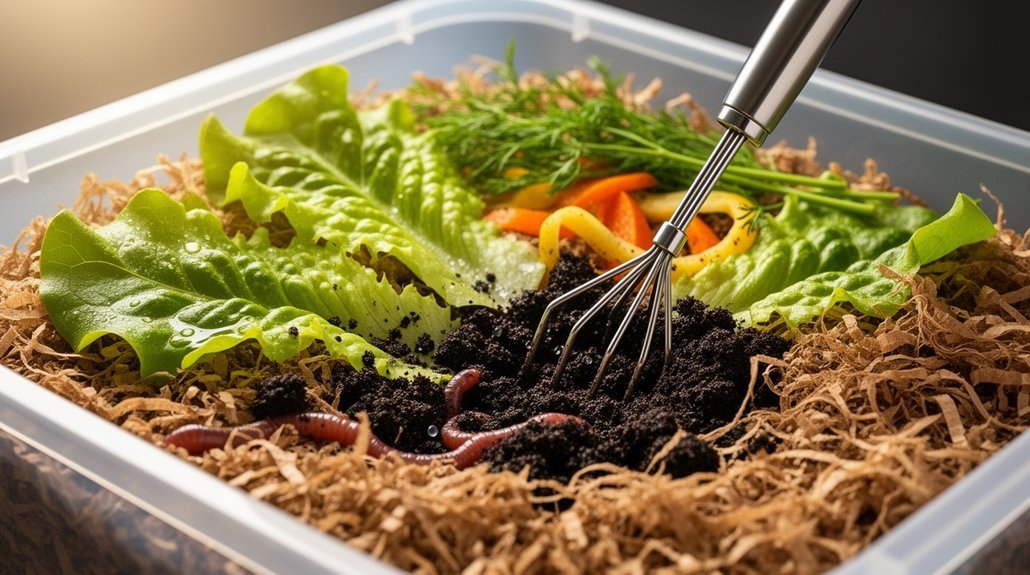
You can maintain aeration effectively by mixing bedding and food at a 2:1 ratio—roughly 67% bedding to 33% food by volume—which distributes moisture and prevents concentrated pockets of decay.
This ratio works best in established bins where you’ve already built biological stability, and it requires bulky, absorbent bedding materials like shredded cardboard or coco coir to keep air pockets intact. Worms and aerobic microbes are central to this process, as they require oxygen to thrive within the bedding structure. Maintaining the right balance of green and brown materials will also support faster decomposition and prevent conditions that attract fruit flies.
If your bin gets too dense or wet, you’ll want to add more dry bedding to restore airflow, since conditions change based on your feeding frequency and material choices.
Why The 2:1 Ratio Works
The 2:1 bedding-to-food ratio works as a practical framework rather than a fixed law, giving your bin enough carbon-rich material to balance the nitrogen-heavy kitchen scraps you’re adding.
Here’s why this balance matters:
- Bedding creates airflow – Pore spaces prevent compaction and reduce odor-causing anaerobic pockets
- Moisture gets absorbed – High-carbon materials soak up excess liquid from decomposing food waste
- Worms have usable habitat – A larger, looser environment lets them spread out and process material evenly
- You can feed smaller portions – Distributed scraps mixed with bedding won’t overwhelm your system
The ratio succeeds because your worms actually eat the aged bedding between feedings, making it part of your active food supply. This buffer prevents overfeeding mistakes and keeps decomposition aerobic and manageable. Products like compost starter accelerators can further enhance microbial activity to speed breakdown of organic materials in your bin. Remember that many variables beyond the ratio itself—including moisture levels, temperature, and worm density—will influence how well your bin performs, so adjust based on what you observe in your specific system.
Adjusting Mix For Conditions
While the 2:1 ratio gives your bin a solid foundation, real-world conditions—moisture levels, feeding speed, and temperature swings—demand flexibility.
| Condition | Adjustment |
|---|---|
| Bin feels wet or soggy | Add dry bedding (cardboard, paper, coco coir) to absorb excess moisture |
| Bin appears dry | Mist lightly or add pre-moistened bedding before feeding |
| Food disappearing rapidly | Reduce bedding slightly so worms access scraps more easily |
| Strong odors developing | Increase dry carbon materials and improve aeration |
Monitor your bin weekly. If moisture pools at the bottom, layer more dry materials throughout. When worms cluster away from food, you’ve likely created moisture imbalance or overfed. Conversely, if decomposition slows dramatically, your mix has shifted too dry or bedding-heavy. Adjust incrementally rather than overhauling everything at once, allowing your system to stabilize between changes. Consider using compostable drawstring bags to store food scraps before adding them to your bin, which can help control moisture introduction and portion sizes. Shredded brown cardboard and other carbon-rich bedding materials help maintain the proper carbon-to-nitrogen balance needed to prevent compaction and support healthy worm activity.
Keep Bedding Moist, Never Waterlogged
How do you know when your vermicompost bin’s moisture is just right? Your bedding should feel like a wrung-out sponge—damp throughout but not dripping. Proper moisture is essential because worms breathe through their skin and need that dampness for gas exchange.
Your vermicompost bedding should feel like a wrung-out sponge—damp but not dripping—so worms can breathe through their skin.
To maintain ideal moisture levels:
- Spray or mist dry areas with a spray bottle instead of pouring water
- Add dry cardboard or newsprint when bedding becomes too wet
- Place soaked newspaper loosely over bedding to retain moisture evenly
- Mix bedding lightly to distribute moisture throughout the bin
Watch for warning signs like standing water, mud-like texture, or condensation on the lid. These indicate excess moisture that creates anaerobic conditions and foul odors. Balance water-rich food scraps with drier bedding materials to keep conditions optimal. Consider using a compost caddy on your kitchen counter to help you collect and manage food scraps before adding them to your vermicompost bin. Dried castings are very hard and do not rehydrate well, so maintain consistent moisture levels to preserve the viability of your finished compost for garden use.
Feed Small Amounts on a Regular Schedule
Balancing moisture is only half the battle—you’ll also need to control what and how much you’re feeding your worms. Small, regular feedings are your best defense against anaerobic buildup. When you add modest portions on a weekly schedule, you match food volume to your worms’ actual consumption rate, preventing fermentation and odor. Excessive feeding combined with high moisture creates conditions that lead to fruit flies and further compromises the oxygen available in your bin.
| Feeding Practice | Benefit |
|---|---|
| Weekly schedule | Maintains consistent biological activity |
| Small portions | Prevents oxygen-poor pockets |
| Matched to population | Reduces uneaten scraps |
| Frequent monitoring | Allows easy adjustments |
Check your bin before each feeding. If scraps remain, reduce the next portion. If food disappears quickly, increase gradually. This approach distributes decomposition evenly throughout your bedding, keeping pore spaces healthy and your bin naturally aerated without disruptive turning.
Cover Food Scraps With Bedding After Feeding
You’ll want to cover your food scraps with bedding because it reduces odors and prevents flies from accessing your waste while supporting the dark conditions worms naturally prefer.
By layering moistened bedding over your scraps, you’re creating air pockets that maintain the loose structure your bin needs for proper airflow and decomposition.
A 2 to 3 inch cover of shredded newspaper or cardboard does double duty—it protects your feeding zone while gradually breaking down into the worm zone itself. Combining two or three bedding types for best results ensures optimal moisture retention and aeration throughout your vermicompost bin.
Why Bedding Coverage Matters
Why does bedding coverage matter so much in vermicompost management? When you cover food scraps with bedding, you’re creating optimal conditions for your worm bin to thrive. Here’s what happens:
- Moisture regulation – Bedding absorbs excess liquid from decomposing food, preventing a soggy, paste-like texture
- Improved airflow – Bulky materials create air pockets that maintain oxygen levels throughout your bin
- Reduced pests – A physical barrier over fresh scraps keeps the feeding area less exposed to unwanted visitors
- Better finished compost – Proper coverage produces crumbly vermicompost instead of dense, wet clumps. Maintaining a thick top layer of bedding supports long-term balance as your worm population grows and continues processing waste materials.
Odor And Pest Prevention
How quickly can a vermicompost bin turn problematic? Exposed food scraps decompose rapidly at the surface, releasing odors and attracting pests within days. You’ll prevent these issues by covering freshly added scraps with shredded newspaper, cardboard, or leaves.
| Problem | Cause | Solution |
|---|---|---|
| Foul odors | Anaerobic decomposition of exposed food | Bury scraps and top-dress with carbon material |
| Fly infestations | Eggs laid on uncovered organic matter | Keep bin covered; use fine mesh screening |
| Excess moisture | 90% water content in food waste | Maintain 2:1 bedding-to-waste ratio |
This burial method reduces fly access, minimizes gas release, and keeps household odors at bay. Adequate bedding absorbs moisture while maintaining oxygen-rich conditions that worms process efficiently. You’ll also want to secure your bin’s lid tightly and line ventilation holes with fine mesh, blocking burrowing pests while allowing necessary airflow. Regular monitoring of your bin at least once a week helps you catch pest signs early and verify that moisture levels remain balanced for optimal worm activity.
Creating Air Pockets Effectively
The most effective way to maintain oxygen-rich conditions in your vermicompost bin is to cover fresh food scraps with bedding immediately after feeding. This simple routine prevents dense mats from forming and keeps air flowing through your bin.
Here’s what you’ll do:
- Bury scraps under shredded cardboard or torn paper right after adding them
- Use coarse bedding pieces—egg cartons and corrugated packaging work best—to create air pockets
- Keep your bedding layer fluffy rather than compact so it stays in contact with scraps
- Repeat this feed-and-cover cycle consistently before odors develop
You’ll prevent fermentation and saturation by maintaining this separation between moist waste and surface air. Blend different bedding textures for optimal results, and avoid over-shredding materials that’d collapse into tight mats. Proper stirring after each feeding helps prevent liquid buildup and ensures oxygen reaches all areas of your bin. Your worms thrive when you stay consistent.
Loosen Compacted Bedding Every Few Weeks
As bedding settles and compacts over time, you’ll notice reduced airflow and slower decomposition in your bin. Dense layers restrict oxygen flow and create anaerobic conditions that slow worm activity. Since worms breathe through their skin, they need moist but airy bedding to thrive.
Loosen your bedding every few weeks by gently lifting and breaking apart compacted sections with a garden fork or trowel. Work in sections to avoid disturbing the entire bin. If the surface has hardened, moisten it first, then remove large clumps.
After loosening, re-cover with soft materials like shredded cardboard or straw to prevent re-compaction. Add dryish absorbent bedding if your bin’s too wet. Periodic checks catch developing compaction before it becomes problematic, keeping your bin productive.
Spot Airflow Problems: Weekly Signs to Watch
Why does your bin suddenly smell sour or swampy? Poor airflow is likely the culprit. You’ll catch problems early by conducting weekly checks:
Poor airflow is likely the culprit behind sour or swampy bin smells. Catch problems early with weekly checks.
- Sniff the bin – Earthy smell means healthy conditions; sour or rotten odors signal anaerobic breakdown and oxygen failure.
- Watch worm behavior – Worms clustering on the lid or upper bedding layers indicate they’re escaping low-oxygen zones.
- Feel the bedding – Soggy, compacted, or slimy material traps moisture and blocks gas exchange throughout the bin.
- Verify drainage and vents – Blocked air holes and drainage points trap excess water and stale air, creating dead zones.
These weekly observations catch airflow trouble before it spirals into serious problems. Act quickly when you spot warning signs.
Frequently Asked Questions
Can I Leave the Bin Lid off Entirely, or Do I Need Ventilation Holes?
You can leave your bin lid off, but you’ll sacrifice pest protection and moisture control. Instead, you should drill ventilation holes in the sides and lid—they’ll give you steady airflow while keeping your bin contained and manageable.
How Often Should I Manually Fluff or Turn My Vermicompost Bin Contents?
You shouldn’t fluff your bin on a strict schedule. Instead, you’ll monitor for problems like compaction, odors, or moisture buildup, then aerate only when needed to restore healthy conditions.
What’s the Best Way to Drain Excess Liquid From My Vermicompost Bin?
Open your spigot if installed, or blot pooled liquid with paper towels. You can also add dry cardboard and leaves to absorb excess moisture. Avoid over-draining—keep your bedding moist for worm health.
How Can I Tell if My Bin Has Become Anaerobic or Oxygen-Deprived?
You’ll notice compacted, slimy bedding, strong rotten odors, pooling leachate, sluggish worms, or escape behavior clustering near the lid. Dark wet zones indicate anaerobic pockets forming where airflow’s weakest.
Should I Aerate My Bin Differently During Different Seasons or Weather Conditions?
You should absolutely adjust your aeration strategy by season. In warm, wet weather, add dry bedding and improve drainage rather than stirring. During cold, dry periods, you’ll aerate gently to avoid chilling your worms.
In Summary
You’ll notice your vermicompost thrives when you’re consistently applying these aeration techniques. By maintaining proper airflow through holes, screening, and loose bedding, you’re creating an ideal environment for your worms. You’ll keep your bin healthy by feeding regularly, covering scraps, and monitoring for compaction weekly. These simple practices ensure you’ve got a productive, odor-free system that breaks down waste efficiently.


Leave a Reply