

You’ll need a shallow, well‑ventilated bin, shredded newspaper or cardboard for bedding, and Red Wigglers at about one pound per half‑square foot. Mix bedding and kitchen scraps at a 50:1 carbon‑to‑nitrogen ratio, keeping the blend as moist as a wrung‑out sponge (60‑70% moisture). Feed a 2:1 brown‑to‑green mix, avoiding citrus, meat, and dairy. Maintain 55‑77 °F, and after five to six months you can harvest nutrient‑rich castings—keep going for detailed setup steps.
Set Your Vermicompost Goal (Waste Reduction or Fertilizer)

How will you measure success—by the pounds of kitchen scraps you divert each month or by the volume of worm‑rich castings that boost your garden? First, decide if your vermicomposting aim is waste reduction or fertilizer production. For waste reduction, fill your worm bin with a steady stream of kitchen scraps and garden trimmings, track pounds processed, and keep bedding moist but not soggy. For fertilizer, prioritize nutrient‑dense castings: monitor the weight or volume of harvested castings and adjust bedding to maintain optimal aeration. Align the bin size and layout with your goal—compact setups favor scrap diversion, while larger, well‑aerated systems enhance castings quality. By setting clear metrics, you turn worms into a measurable tool for either cutting landfill waste or enriching soil. Important concept
Select the Best Vermicompost Bin for Indoor Use
After deciding whether you’re aiming to cut waste or boost garden nutrition, the next step is choosing a bin that fits indoor constraints. For indoor use, a shallow, wide tub with drilled air holes and a leachate catcher works well, as does a stackable tray system that lifts worms as food processes. Use two opaque 14‑gallon plastic totes, drill up to 20 ¼‑inch holes in the bottom bin, and add optional 1‑inch vents along the top edge for airflow. Keep the interior dark, lid ajar, and maintain 55–77 °F with 60–70 % bedding moisture. Start with 1 lb Red Wiggler worms per 0.5 sq ft, covering them lightly with damp newspaper. General Fermentation Tools Context Some of the recommended bokashi masher/tamper tools use wooden or stainless steel designs and are compatible with wide-mouth and regular-mouth jars, which parallels the idea of using adaptable containers and fittings in vermicomposting setups.
Prepare Carbon‑Rich Vermicompost Bedding
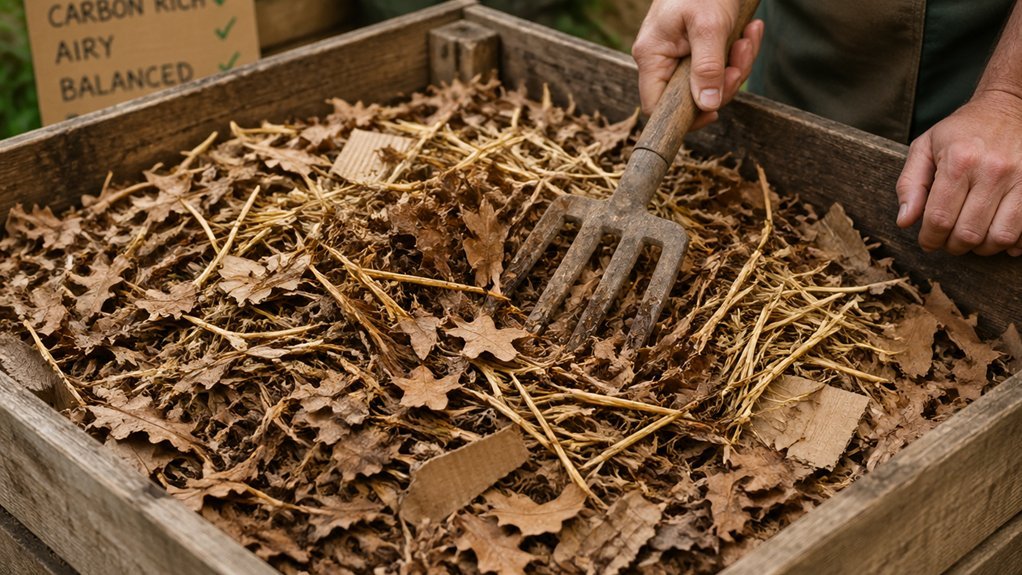
Ever wondered why a solid, carbon‑rich base matters for thriving vermicomposting? You’ll start by gathering shredded cardboard, newspaper, or leaves—remove any tape. Aim for a four‑inch depth of Bedding that fills roughly a quarter of your bin. Pre‑wet the material until it feels like a wrung‑out sponge, using untreated or purified water. Mix it thoroughly so moisture distributes evenly, then press out excess liquid until only a few drops remain. This pre‑wetted, carbon‑rich layer holds the right moisture while still allowing aeration. After you’ve packed the base, you’re ready to add nitrogen‑rich scraps on top, keeping the worm habitat balanced and productive. The chosen bedding should be dishwasher‑safe for easy cleanup when you rotate or refresh materials Optimal moisture management.
Add Food Your Worms Love (and What to Skip)
You’ll keep your worms thriving by feeding them greens like fruit scraps, coffee grounds, and used tea bags while steering clear of onions, citrus, meat, dairy, oily foods, and any rotten or waste material.
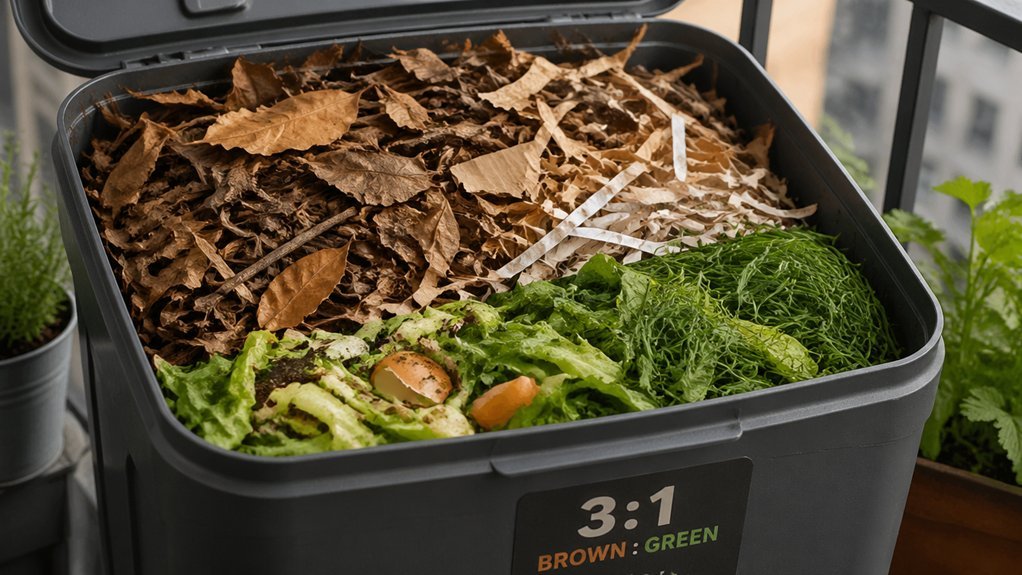
Aim for a 2:1 brown‑to‑green ratio, using shredded paper, leaves, or cardboard as the carbon source, and keep the bedding moist like a wrung‑out sponge.
Feed 1–2 cups of greens per pound of worms each time, and stop adding food a week before harvest to dry the bin slightly and coax the worms out of the collection area.
Green Food Choices
Which plant scraps do your red wigglers love most? They thrive on green foods like leafy greens, vegetable scraps, fruit scraps, and coffee grounds. Toss in a handful of grass clippings and other vegetarian scraps to keep nitrogen levels high. Aim for a two‑to‑one green‑to‑brown volume ratio, balancing the nitrogen‑rich greens with shredded newspaper or cardboard. Mix the greens lightly into the bedding, then mist to maintain moisture without soaking. Rotate the pile every few days to ensure aeration and prevent clumping. Watch for untouched bits after two weeks; if they linger, cut back on greens. By feeding consistently with these plant‑based items, you’ll keep your worm bin healthy and productive a 1-4 word phrase and ensure steady decomposition.
Avoid Harmful Ingredients
Wonder which kitchen leftovers keep your red wigglers thriving? You’ll love the easy‑to‑remember list of what to skip, because avoiding the wrong foods keeps your bin odor‑free and aerobic.
Citrus and onions – their acidity repels worms and can create an anaerobic environment.
Meat, dairy, and oily foods – they rot quickly, attract pests, and cause foul smells.
Pet waste – it harbors pathogens and overwhelms the microbes that help worms digest.
Rotten food – spoiled scraps produce anaerobic pockets and slow down decomposition.
Stick to fresh fruit peels, leafy greens, coffee grounds, and shredded paper. Balance browns and greens 2:1, and your vermicompost will stay healthy, moist, and bustling with activity. Targeted minerals can support healthier microbial activity when added in appropriate amounts and integrated with your mix.
Mix Vermicompost Bedding & Food (50:1 Ratio)

You’ll start by combining a carbon‑rich bedding with nitrogen‑rich food at a 50:1 ratio, then give the mix a quick squeeze so only a few drops remain.
Pre‑wet the bedding with clean water before adding the greens to ensure the right moisture level.
This balance keeps the material damp like a wrung‑out sponge and prevents anaerobic conditions for your worms.
Carbon‑Rich Bedding
Where does the magic of a thriving worm bin begin? You start with carbon‑rich bedding that creates the perfect home for your cast. Mix shredded newspaper, leaf mold, and two cups of forest soil, then pre‑wet to a wrung‑out sponge. Fill about one‑quarter of the housing volume, keeping moisture balance just right to avoid soggy conditions.
This bedding volume, once settled, gives worms a stable, carbon‑dominant environment before you introduce any greens. In addition, using non‑porous, odor‑resistant materials helps maintain a clean, breathable habitat for beneficial microbes airtight containers.
Nitrogen‑Rich Food
Typically you start by combining your carbon‑rich bedding with nitrogen‑rich scraps at a 50:1 ratio—50 parts dry bedding to 1 part coffee grounds, tea bags, vegetables, fruit, grass clippings, or other vegetarian waste. This keeps the nitrogen balance right and prevents odors.
| Input | Approx. Ratio |
|---|---|
| Coffee grounds | 1 part |
| Used tea bags | 1 part |
| Vegetable scraps | 1 part |
| Fruit scraps | 1 part |
| Grass clippings | 1 part |
Add each nitrogen-rich input sparingly, then squeeze out excess moisture so only a few drops remain. The mix should feel crumbly, not soggy, ensuring oxygen flow for the worms. Consistently maintaining the 50:1 ratio during ongoing feeding sustains a healthy vermicompost system. A practical odor-management approach can help maintain a balanced environment during decomposition, aligning with odor-control considerations from urban composting guidance.
Moisture Balance Ratio
After you’ve measured the carbon‑rich bedding and added the nitrogen‑rich scraps at the 50:1 ratio, the next step is getting the moisture right. Aim for a moisture level that feels like a wrung‑out sponge—about 60–70% moisture throughout the vermicompost. Squeeze the blend until only a few drops drip, then check the consistency. If it’s soggy, sprinkle dry bedding; if it’s crumbly, mist water until the texture softens.
Quick moisture‑check steps
- Squeeze a handful; it should drip a few drops.
- Feel the mix— it should hold together without leaking.
- Add dry bedding to lower excess moisture.
- Mist water lightly to raise low moisture.
Maintaining the proper bedding-to-nitrogen ratio and vermicompost moisture ensures thriving worms and fast decomposition.
Introduce Red Wiggler Worms to Vermicompost
Ever wondered how to get your red wigglers settled quickly? Start by preparing a dark, well‑ventilated bin with a moist, breathable bedding of damp newspaper or burlap. Aim for a temperature of 55–77 °F and keep the moisture level like a wrung‑out sponge. For your starter setup, sprinkle about 1 lb of Red Wiggler worms per 0.5 ft² of surface, then let them burrow downward; a brief exposure to indirect light encourages them to dive into the bedding.
| Item | Recommended Amount |
|---|---|
| Worms (Red Wiggler) | 1 lb per 0.5 ft² |
| Bedding | Damp newspaper or burlap |
| Temperature | 55–77 °F |
| Moisture | Moist, not soggy |
Once they’re in, the worms will reproduce rapidly, producing 2–5 cocoons each, ensuring a thriving vermicomposting system.
Maintain Vermicompost Temperature & Humidity (55‑77 °F)
Keep the bin between 55 °F and 77 °F so your red wigglers stay active and avoid stress.
Aim for a moisture level of 60‑70 %, which feels like a wrung‑out sponge and prevents anaerobic conditions.
If the bedding feels too wet, add dry material; if it’s too dry, mist it until you get just a few drops when you squeeze a handful.
Optimal Temperature Range
What temperature should your worm bin stay at to keep the compost thriving? Aim for 55 °F–77 °F (13 °C–25 °C). This range fuels vermicomposting, keeps red wigglers active, and supports the microbial community that drives decomposition.
- Bin placement – Choose a shaded, stable spot away from direct sun or drafts.
- Insulation – Use straw, foam, or a wooden box to buffer against cold snaps and heat waves.
- Monitoring – Check the temperature daily with a simple thermometer; act quickly if it drifts.
- Moisture tie‑in – Keep the bedding as damp as a wrung‑out sponge, which helps regulate temperature naturally.
If the temperature strays, adjust placement or add insulation to bring it back into the optimal 55‑77 °F window. This proactive approach maintains worm health and maximizes compost production.
Moisture Level Management
How do you keep your worm bin humming along? You maintain moisture at 60–70% by checking the bedding moisture daily. Do a squeeze test: grab a handful, squeeze, and watch for only a few drops. If the wrung-out sponge feels soggy and drips excess water, add dry shredded newspaper or cardboard to restore moisture balance. When it feels dry, mist water lightly until the bedding reaches that wrung-out sponge consistency. Keep the bin temperature between 55‑80 °F, ideally around 70 °F, because stable humidity supports worm activity. Adjust by adding dry bedding or misting water as needed, and repeat the squeeze test each week to keep conditions optimal.
Feed Worms Properly: 2 : 1 Brown‑to‑Green Ratio
Ever wondered why your worm bin smells fresh instead of sour? You’re probably nailing the vermicomposting basics: a 2:1 brown‑to‑green ratio, balanced moisture, and a steady feeding schedule. Keep the mix right and the worms stay happy.
- Gather browns – shredded paper, cardboard, dried leaves.
- Add greens – kitchen scraps, coffee grounds, tea bags.
- Combine – aim for two parts brown to one part green, then fluff with bedding.
- Check moisture – target 60‑70 % and mist lightly if needed.
Monitor Moisture & Aeration: Spot‑Check & Adjust
Curious about keeping your worm bin breathing easy? Check moisture by squeezing a handful of bedding; you should see only a few drops. Aim for a 60–70% moisture level, adjusting with dry bedding if it’s too wet or misting lightly if it’s dry. Keep humidity stable at 55–80°F, ideally 70°F, to prevent rapid evaporation that disrupts aeration. Ensure airflow by maintaining air holes and a dark interior; add more brown bedding or flip the mix when you notice compaction or anaerobic smells. If moisture shifts, add dry shredded newspaper or leaves to improve drainage, or mist gently to restore the target level. Regular spot‑checks let you balance moisture and aeration, keeping your vermicompost thriving.
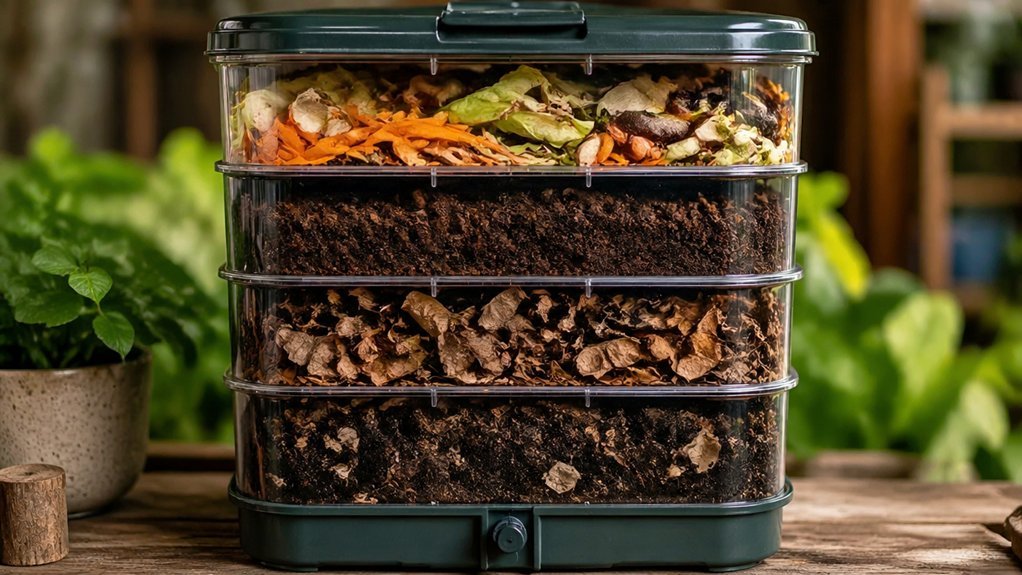
Harvest Castings: Step‑by‑Step Guide (5‑6 Months)
Once your bin’s moisture and aeration are steady, it’s time to collect the worm castings. Open the bottom of the worm bag or bin, let the rich vermicompost fall into a clean container, then gently shake the remaining worms back onto the fresh bedding. If you want a finer end product, run the material through a 1/4‑inch sieve; the coarse bits go back to the bin for another round. Finally, store the sifted castings in a breathable bag until you’re ready to use them.
- Open worm bag/bin bottom.
- Collect castings in container.
- Return worms to top bedding.
- Sift for refined end product.
Store & Use Your Vermicompost: Dilution & Application Tips
Wondering how to keep your worm castings fresh and put them to work without burning plants? Store harvested castings in a breathable container in a cool, dry place; they’ll stay crumbly and earthy for months. When you’re ready to feed, treat the castings as a soil amendment or make vermicompost tea.
For tea, mix a 1:3 dilution ratio (one part castings to three parts water), stir, let steep 24 hours, then strain. Use the liquid as a foliar spray or root drench—this is your compost tea for nutrient management.
For direct application, sprinkle a thin layer of castings around plant bases or blend into potting mix; avoid heavy applications to prevent nitrogen burn. Follow these application tips and your garden will thrive.
Frequently Asked Questions
What Is the Mixing Ratio for Vermicompost?
You should keep a 50:1 bedding‑to‑green ratio, meaning fifty parts carbon material for every one part nitrogen‑rich food, and feed with two parts browns to one part greens by volume.
What Are the 5 Mistakes That People Commonly Make When Composting With Worms?
You’ll overfeed greens, ignore moisture levels, add rotten or oily foods, neglect ventilation, and harvest too early. These mistakes cause odor, compaction, slow worm activity, pest problems, and low‑quality castings.
What Is the Golden Ratio for Composting?
You’ll aim for a 2:1 carbon‑to‑nitrogen volume ratio—about two parts brown, carbon‑rich material to one part green, nitrogen‑rich waste—keeping the bin moist, aerated, and odor‑free.
What Three Items Should Not Be Placed in a Compost Pile?
You should keep meat, dairy, and oily foods out of the compost pile because they cause odors, attract pests, and slow decomposition, making the vermicompost unhealthy and inefficient.
In Summary
By setting a clear goal, picking the right indoor bin, and balancing carbon‑rich bedding with the foods your worms love, you’ll create a thriving vermicompost system. Keep the mix at a 50:1 bedding‑to‑food ratio, feed a 2:1 brown‑to‑green split, and check moisture and aeration regularly. After five to six months, harvest the rich castings, store them properly, and dilute for use. Your garden will thank you with healthier plants and less waste.
Leave a Reply