

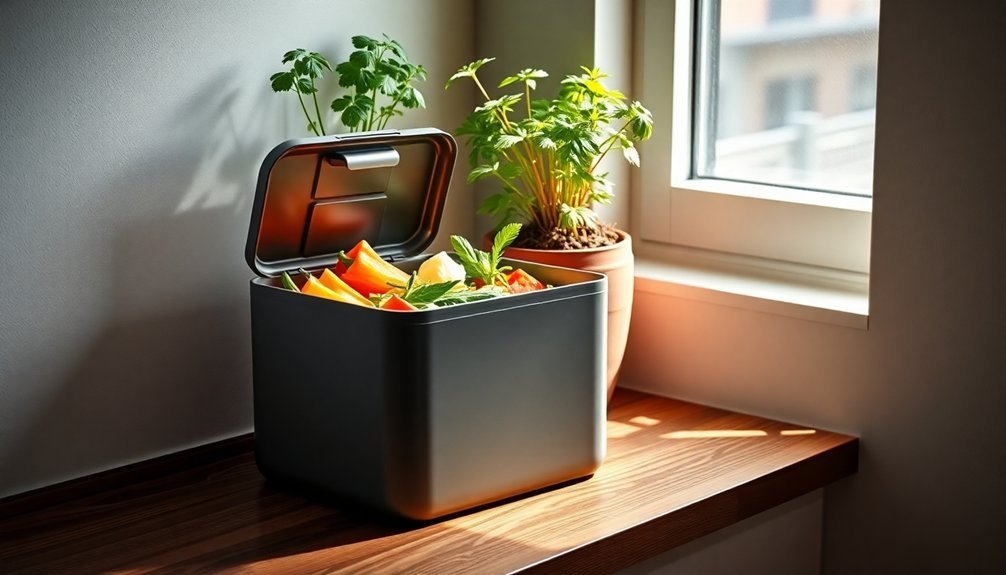
You can create a space-saving bokashi composting system using two 5-gallon buckets, one nestled inside the other with drainage holes. Add kitchen scraps layered with bokashi bran in the top bucket, maintaining an airtight seal to promote fermentation. Collect nutrient-rich tea from the bottom bucket every few days for plant fertilizer. This compact system fits under your sink and handles all food waste, including meat and dairy. Discover how this simple setup transforms waste into garden gold.
What Makes Bokashi Perfect for Apartment Living
While traditional composting methods often require outdoor space and constant maintenance, bokashi composting offers apartment dwellers a perfect solution for managing food waste.
You'll find this innovative system fits perfectly under your kitchen sink or on your balcony, making it ideal for small living spaces.
What sets bokashi apart is its ability to process all types of food waste, including meat and dairy, without producing unpleasant odors. The process generates nutrient-rich liquid that can be drained and used as plant fertilizer.
The system uses beneficial microorganisms that ferment your waste in an airtight container, preventing pest problems and completing the process in just two weeks.
You won't need to turn or maintain the compost regularly, making it incredibly low-maintenance.
Plus, the sealed environment guarantees your composting activities won't disturb neighbors or attract unwanted insects, even in close-quarter apartment living.
Essential Tools and Materials for Your DIY Setup
Your basic Bokashi setup requires just a few key items: two five-gallon buckets with tight-fitting lids, bokashi bran, and simple tools like a drill for creating drainage holes.
You'll also need materials for the drainage layer, such as old fabric or mesh, and a plate or cardboard piece to compress your food scraps. The system requires airtight conditions to ensure proper fermentation of your kitchen waste.
For the best results, make sure you're using food-grade containers and high-quality bokashi bran, whether store-bought or homemade using effective microorganisms and molasses.
Basic Equipment Checklist
Success in bokashi composting starts with gathering the right equipment for your DIY setup.
You'll need food-grade plastic buckets (2-5 gallons) with airtight lids to create your fermentation system. Make certain you've got basic tools like a drill and paddle bits for making holes, plus spigots with couplings for efficient drainage. Indoor composting options are ideal for urban living where space is limited.
- Two durable plastic buckets – one for fermentation, one for liquid collection
- Airtight lids (standard or Gamma Seal) to maintain anaerobic conditions
- Spigot assembly with washers and nuts for a watertight seal
- Dirt traps or grit guards to separate liquid from solid waste
Don't forget your essential supplies like bokashi bran and containers for collecting tea.
Position your setup at room temperature, away from direct sunlight, to guarantee ideal fermentation conditions.
Proper Materials Matter
Choosing the right materials for bokashi composting guarantees a successful fermentation process and ideal waste breakdown. You'll need Effective Microorganisms (EM), bran, molasses, and chlorine-free water as your core ingredients. For budget-friendly alternatives, consider using coffee chaff, dry leaves, or untreated sawdust instead of traditional bran. Making your own bokashi can yield significant cost savings compared to purchasing pre-made options from retailers.
| Material | Purpose | Where to Find |
|---|---|---|
| EM-1 Solution | Fermentation starter | Amazon.ca |
| Wheat/Rice Bran | Moisture absorption | Feed stores |
| Molasses | Microbe food source | Grocery stores |
| Water | Moisture balance | Tap (dechlorinated) |
| Kitchen Towels | Drainage filter | Household items |
Mix 1.5 tablespoons each of EM-1 and molasses with 3 cups of water for every 3 pounds of bran material. Store your prepared mix in an airtight container for two weeks to properly ferment before use.
Step-by-Step Bucket Assembly Guide

You'll start by drilling multiple 3/8" to 1/2" holes in the bottom of your first bucket, making sure to smooth any sharp edges with sandpaper.
Place this drilled bucket inside your second, hole-free bucket, ensuring they fit snugly together with no gaps that could let in unwanted air.
Line the bottom of the drilled bucket with a clean cloth rag to help maintain proper anaerobic conditions during the fermentation process.
Test your system's effectiveness by adding a tight-fitting lid and checking that everything's properly aligned and stable, using supports if needed to keep the inner bucket from shifting.
Drill Perfect Drainage Holes
Proper drainage holes form the foundation of an effective bokashi composting system. You'll need to drill them in the bottom of your inner bucket to collect the valuable bokashi tea in the outer container. For best results, place holes around the perimeter rather than the center to maintain structural integrity. While drainage holes can work, avoiding drilled holes may be better since they can lead to unwanted odors.
- Use a drill for multiple small holes (about two dozen) or a circular saw for wider slots
- Smooth all edges with sandpaper to remove plastic shards
- Keep holes away from the bucket's center to prevent cracking
- Test drainage by tilting the bucket to guarantee proper liquid flow
Once you've created the drainage system, check regularly for clogs and clear them using a potato masher if needed.
Stack and Secure Buckets
Once you've prepared your drainage holes, stacking and securing the bokashi buckets creates a stable, efficient composting system.
Place the bucket with drainage holes on top of a solid collection bucket, ensuring they're nested snugly. The top bucket will hold your food scraps and bokashi bran, while the bottom one collects the valuable bokashi tea.
Position your stacked system in a space-saving spot, like under the sink or in a kitchen corner. To prevent shifting, consider adding brackets or fasteners to secure the buckets.
Check that both lids fit tightly to maintain the essential anaerobic environment needed for fermentation. Using quality buckets is crucial for maintaining an effective composting process over time.
If you're composting regularly, set up multiple bucket pairs to maintain continuous operation while one set completes its 10-14 day fermentation cycle.
Test System Fit
Before adding any food waste, testing your bokashi bucket system's fit guarantees smooth operation and prevents future complications.
Start by stacking your nested buckets and ensuring they fit securely together. Check that the inner bucket sits slightly elevated above the bottom of the outer bucket to create space for liquid collection. Add a heaping tablespoon of bokashi bran to test the drainer plate's distribution capability.
- Close the spigot fully and pour a small amount of water to verify there's no leakage.
- Press down on the drainer plate to confirm it fits snugly at the bottom.
- Test the lid's seal by pressing around the edges – it should create an airtight closure.
- Verify drain holes aren't blocked and water flows freely into the collection area.
Make any needed adjustments now, like smoothing rough edges or repositioning components, before you begin your composting journey.
Best Practices for Adding Kitchen Scraps

Successfully managing your bokashi composting system depends on following key practices when adding kitchen scraps. Start by layering approximately 2 cups of food waste, then sprinkle 1/8 cup of bokashi bran on top. You'll need to maintain this layering pattern throughout the filling process. Healthy soil development is supported through this sustainable composting method.
| Waste Type | Can Include | Special Notes |
|---|---|---|
| Fresh Scraps | Fruits, vegetables, peels | Add immediately |
| Protein Items | Meat, dairy, bones | Minimize liquid content |
| Processed Foods | Bread, pasta, cereals | Avoid moldy items |
| Other Items | Eggshells, paper | Limited nutrient value |
Don't forget to press down gently on the layers to remove air pockets. You'll know you're doing it right when you detect a pickle-like fermentation smell. Always end with a bran layer on top and keep the lid properly positioned to maintain anaerobic conditions.
Harvesting and Using Your Bokashi Tea
While maintaining proper layering of your scraps is key, the bokashi process produces another valuable resource: bokashi tea.
You'll need to collect this nutrient-rich liquid every other day through your bucket's spigot to prevent odors and encourage fermentation. The beneficial bacteria strains in the tea result from the specialized inoculant mixture of wheat bran and molasses.
For the best results, follow these essential tips:
- Dilute the tea at least 1:100 with unchlorinated water before applying to plants
- Use the tea immediately for maximum microbial benefits, or store it in the fridge
- Apply as a foliar spray directly to your plants for quick nutrient absorption
- Consider freezing excess tea to preserve it for future use
The tea isn't just for plants – you can also use it to control slime in pipes and septic systems.
Remember to keep it away from direct sunlight to maintain its beneficial microorganisms.
Transforming Fermented Waste Into Garden Gold

The magic of bokashi composting truly shines when you're ready to transform your fermented waste into nutrient-rich soil.
You'll find that this process is three times faster than traditional composting methods while producing fewer greenhouse gases and retaining more nutrients.
To maximize your garden's benefits, bury your fermented waste in your soil, where it'll break down into premium compost within 2-4 weeks. The process effectively handles all types of food waste, including meat and dairy products that traditional composting can't process.
You're not just creating compost; you're building a thriving ecosystem of beneficial microorganisms that'll enhance your soil's structure and fertility.
The process produces amino acids instead of ammonia, making nutrients more readily available for your plants.
You'll notice improved water retention, stronger plant growth, and better crop yields – all without chemical fertilizers.
It's a sustainable solution that keeps working year after year.
Maintaining Your System in Limited Space
Making the most of limited space doesn't mean sacrificing effective composting. Your bokashi system can thrive in a small apartment when you follow smart maintenance practices.
Place your bin in a shaded corner away from direct sunlight, and guarantee it's easily accessible for daily food additions and tea collection. Adding all food waste types makes this method incredibly versatile for apartment dwellers.
Keep your system running smoothly with these essential practices:
- Press down scraps firmly after each addition to eliminate air pockets
- Drain bokashi tea every 2-3 days to prevent moisture buildup
- Clean the bin thoroughly between batches to maintain hygiene
- Use vertical storage for supplies on wall-mounted shelves
Monitor your bin's temperature and keep it sealed tightly to maintain ideal fermentation conditions.
You'll maximize efficiency by filling the container within a two-week period, guaranteeing a continuous cycle of waste transformation.
Frequently Asked Questions
Can Bokashi Composting Affect Nearby Plants if Kept on a Balcony?
Your properly maintained bokashi system won't harm nearby balcony plants. In fact, it'll benefit them through enriched soil microbes and nutrients, though you should guarantee the bokashi tea doesn't directly contact plant roots.
How Long Does Bokashi Bran Remain Effective in Storage?
Your bokashi bran will stay effective for 6-12 months when you store it properly in an airtight container away from sunlight and moisture. Keep it at room temperature, and don't let it freeze.
What Happens if Mold Develops During the Fermentation Process?
If you see white mold, don't worry – it's actually beneficial for fermentation. However, if you notice blue, green, or black mold, you'll need to dispose of the contents and restart your process.
Should I Continue Adding Bran When the Bucket Is Nearly Full?
Yes, you should continue adding bran until your bucket's completely full. Add a thick final layer on top to guarantee proper fermentation and odor control. Don't skip this step – it's essential for success.
Can I Use Alternatives to Bokashi Bran if I Run Out?
Yes, you can substitute Bokashi bran with wheat bran, barley bran, or even coffee grounds mixed with EM1 and molasses. While these alternatives might take more prep time, they'll save you money and work effectively.
In Summary
You'll find bokashi composting transforms your kitchen waste management while fitting perfectly into your urban lifestyle. With minimal space requirements and virtually no odor, your DIY system will produce both nutrient-rich tea and pre-compost material. Keep experimenting with your setup, adjusting the process to match your needs, and you'll soon master this efficient, eco-friendly method of reducing household waste.


Leave a Reply