
You’re probably wondering which DIY compost bin guide’ll actually work for your space and budget. Building your own setup isn’t complicated, but choosing the right design matters. The wrong approach wastes time and money. We’ve narrowed down three proven guides that’ll transform how you handle kitchen scraps—and the differences between them might surprise you.
| TOP XIAN Underground Worm Composting Bin Kit |  | Best for Beginners | Compost Type: Worm composting (vermicomposting) | Primary Material: Polypropylene (PP) | Setup Complexity: Pre-assembled, ready to use | CHECK ON AMAZON | Read Our Analysis |
| DIY Compost Bin Set (4 Brackets). Durable Stainless Steel. Build to Size | 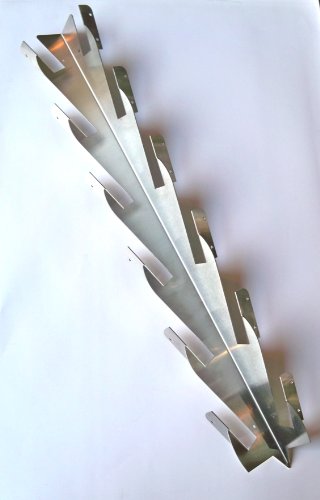 | Best for Customization | Compost Type: Traditional aerobic composting | Primary Material: Stainless steel (#4, 16 gauge) | Setup Complexity: DIY assembly required (user supplies boards) | CHECK ON AMAZON | Read Our Analysis |
| LALASTAR Inner Bucket for 1 Gallon Compost Bin |  | Best Replacement Part | Compost Type: Indoor bucket composting | Primary Material: Polyethylene (PE) and Polypropylene (PP) | Setup Complexity: Replacement component only (requires existing bin) | CHECK ON AMAZON | Read Our Analysis |
More Details on Our Top Picks
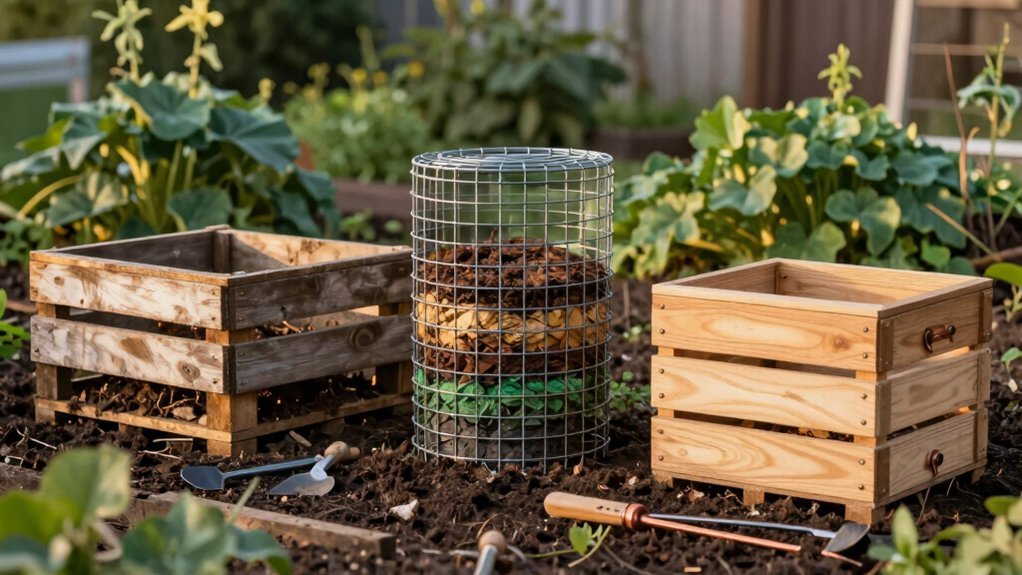
TOP XIAN Underground Worm Composting Bin Kit
If you’re looking for an entry point into worm composting without overwhelming complexity or expense, the TOP XIAN Underground Worm Composting Bin Kit delivers exactly what beginners need. This compact 7×7×7.4-inch unit harnesses earthworms to transform your kitchen scraps into nitrogen-rich compost within 2–3 months. You’ll benefit from its 360° ventilation system, which includes base holes for worm access and a perforated lid that promotes aerobic decomposition. The wildlife-resistant twist-lock lid keeps animals out, while underground placement minimizes odors. Built from durable, corrosion-resistant PP material, it’s perfect for garden beds or home use. Note that you’ll need to source your own earthworms separately.
- Compost Type:Worm composting (vermicomposting)
- Primary Material:Polypropylene (PP)
- Setup Complexity:Pre-assembled, ready to use
- Capacity/Scale:Compact mini (7×7×7.4 inches)
- Durability:Corrosion-resistant, long-lasting
- Intended Setting:Underground/outdoor garden beds
- Additional Feature:360° ventilation system
- Additional Feature:Wildlife-resistant twist-lock lid
- Additional Feature:2–3 month decomposition time
DIY Compost Bin Set (4 Brackets). Durable Stainless Steel. Build to Size
Looking for a composting solution that adapts to your space and budget? The K & K Komposter DIY Compost Bin Set offers exactly that flexibility. You’ll receive four stainless steel brackets that hold up to twenty boards—which you supply—creating a customizable 3-foot-tall bin. Built from durable 16-gauge #4 stainless steel, this system promises lifetime durability without the hefty price tag of pre-assembled options. Assembly’s straightforward, and you’ll appreciate the sturdy construction that handles years of composting. HGTV’s Paul James recommends this bracket-style approach as the best solution he’s found, making it an endorsed choice for serious composters.
- Compost Type:Traditional aerobic composting
- Primary Material:Stainless steel (#4, 16 gauge)
- Setup Complexity:DIY assembly required (user supplies boards)
- Capacity/Scale:Large 3-foot height (holds 20 boards)
- Durability:Lifetime durability
- Intended Setting:Outdoor yard composting
- Additional Feature:Customizable board capacity (20)
- Additional Feature:Lifetime durability guarantee
- Additional Feature:HGTV expert endorsed
LALASTAR Inner Bucket for 1 Gallon Compost Bin
You’ll want this replacement inner bucket if you’re already using a LALASTAR 1 Gallon Compost Bin and need a direct replacement. This cylindrical black bucket is crafted from durable polyethylene and polypropylene materials, designed specifically for LALASTAR’s 1-gallon system. The inner bucket measures 8.58 by 6.57 by 6.3 inches and weighs just 5.5 ounces, making it lightweight yet functional. With a 4.2-star rating from 31 customer reviews, it’s proven reliable for indoor composting needs. You’ll appreciate its straightforward compatibility—it works exclusively with LALASTAR’s 1-gallon bins, ensuring proper fit and performance. If your current bucket’s worn out or damaged, this replacement gets you composting again quickly.
- Compost Type:Indoor bucket composting
- Primary Material:Polyethylene (PE) and Polypropylene (PP)
- Setup Complexity:Replacement component only (requires existing bin)
- Capacity/Scale:Small 1-gallon inner bucket
- Durability:Standard PE/PP construction
- Intended Setting:Indoor home composting
- Additional Feature:Replacement inner bucket component
- Additional Feature:Compact cylindrical design
- Additional Feature:4.2-star customer rating
Factors to Consider When Choosing DIY Compost Bin Building Guides
When you’re selecting a DIY compost bin guide, you’ll want to weigh your budget against material costs and ensure the design fits your available space. Consider how long you expect the bin to last, what assembly skills you possess, and whether you’re willing to invest time in construction complexity. Your choice should also account for how quickly you want compost production and the efficiency level that matches your composting goals.
Budget And Material Costs
Several factors markedly impact the total cost of building your DIY compost bin, starting with your choice of materials. Basic wooden frames or wire mesh kits cost considerably less than stainless steel or high-density plastic systems. You’ll need to budget an additional 10–25% for miscellaneous items like hardware, sealants, and ventilation components that aren’t always obvious upfront.
Consider using recycled or repurposed materials to slash costs, though you’ll invest extra time preparing them. Conversely, pre-cut boards and ready-to-assemble kits save labor but typically cost more per unit than bulk generic materials. Don’t overlook shipping fees—large, heavy components can substantially increase your total expenses. Calculate all these elements before committing to ensure your project stays within budget.
Space And Size Requirements
How much room do you actually have for a compost bin? Start by measuring your available outdoor or indoor space, checking length, width, and height to ensure proper fit and airflow circulation. You’ll want to confirm the DIY kit dimensions match your intended location while leaving room for material handling.
For tight spaces, consider compact or vertical designs. If you’ve got more room, larger 3-foot-tall assemblies offer higher waste capacity. Verify your surface can support the bin—you’ll need stable, level ground like concrete or a sturdy stand to prevent tipping.
Finally, align your bin size with your typical kitchen waste output. Plan for multiple units if you’re composting continuously.
Durability And Longevity Expectations
Building a compost bin that’ll stand the test of time requires careful attention to material quality and construction details. You’ll want to prioritize 16-gauge stainless steel brackets over lightweight plastics, as they resist corrosion and maintain structural integrity longer. Reinforced welds and joints prevent loosening during repeated assembly and disassembly cycles. Choose designs that support your bin’s full weight without bending, ensuring durability throughout years of use. For outdoor bins, select UV-stable components and corrosion-resistant finishes to combat environmental degradation. Check warranty lengths—extended warranties typically signal more robust construction. By investing in quality materials and proven designs, you’ll create a compost bin that reliably functions for years, maximizing your gardening investment.
Assembly Complexity And Skill Level
Why should you care about assembly difficulty when selecting a compost bin guide? Your skill level and available time directly impact project success. Modular bracket systems and pre-fabricated panels demand minimal carpentry expertise, while custom-built, welded units require advanced skills and precision measurements.
Clear instructions with diagrams dramatically reduce errors for novices. Match your chosen guide’s complexity to both your bin size and capabilities—larger, reinforced bins necessitate sturdier joinery and more careful construction.
Adjustable kits offer flexibility, scaling from small to larger capacities with varying assembly steps. Consider safety requirements too: proper securing methods and ventilation planning influence construction techniques. Select a guide matching your experience level to ensure a successful, functional compost system.
Composting Speed And Efficiency
Once you’ve selected a bin guide matching your skill level, you’ll want to focus on how quickly your system breaks down organic material. Composting speed depends on several key factors you can control during construction and maintenance.
Choose a smaller, compact bin design—it’ll warm up faster, accelerating microbial activity. Ensure your guide includes multi-directional vents or a perforated lid to maintain aerobic conditions essential for rapid decomposition.
Balance your carbon-to-nitrogen ratio around 25–30:1 to optimize breakdown speed while minimizing odors. If your bin design allows for regular turning or mixing, you’ll significantly enhance oxygen distribution and composting efficiency.
Finally, maintain moisture levels between 50–60%. Drier waste slows decomposition, while overly wet conditions create anaerobic problems and foul smells.
Maintenance And Odor Management
Since you’ll be living with your compost system, choosing a bin design that supports effortless maintenance is ensure. You’ll want to turn your pile every 1–2 weeks to maintain aerobic conditions and prevent odors. Select a bin with adequate ventilation or perforations that allow consistent airflow, which sustains beneficial microbes and reduces foul smells.
Balance your green and brown materials to achieve a 25–30:1 carbon-to-nitrogen ratio, minimizing odor issues. Monitor moisture carefully—your compost should feel like a wrung-out sponge, not saturated. Additionally, look for bins featuring tight lids and secure seals to contain odors effectively. Regular checks for compacted layers and pests help maintain peak performance. These design considerations ensure your composting experience remains pleasant and productive.
Frequently Asked Questions
What Are the Best Materials to Use for Building a Durable DIY Compost Bin?
You’ll want to use rot-resistant wood like cedar or redwood, untreated plastic bins, or galvanized wire mesh. These materials won’t degrade quickly and’ll withstand moisture and temperature changes effectively throughout composting.
How Long Does It Typically Take Compost to Fully Decompose in a Homemade Bin?
You’ll typically need 2-6 months for your compost to fully decompose in a homemade bin, depending on your materials, moisture levels, temperature, and how often you’re turning it. Warm conditions and frequent mixing speed things up considerably.
Can I Use a DIY Compost Bin Indoors or Only Outdoors?
You can use a DIY compost bin indoors, but you’ll need proper ventilation and moisture control to prevent odors. Indoor bins work best with smaller quantities and require more frequent maintenance than outdoor systems.
What Common Mistakes Should Beginners Avoid When Building Their First Compost Bin?
You’ll want to avoid making your bin too small, neglecting drainage holes, mixing wrong materials ratios, and using treated wood. Don’t skip ventilation or ignore moisture levels—you’ll face odors and slow decomposition.
How Do I Troubleshoot Odor Problems in My Homemade Compost Bin?
You’ll eliminate odors by balancing brown and green materials, ensuring proper aeration, and avoiding excess moisture. Add more dry leaves or cardboard, turn your pile regularly, and cover food scraps with soil.


Leave a Reply