
You’re likely wondering which worm composting guide’ll actually work for your space and skill level. With so many options flooding the market, you’ll want instruction materials that balance clarity with practical setup details. Whether you’re working with limited square footage or tackling your first batch of red wigglers, the right guide makes all the difference. Let’s explore what separates the standout guides.
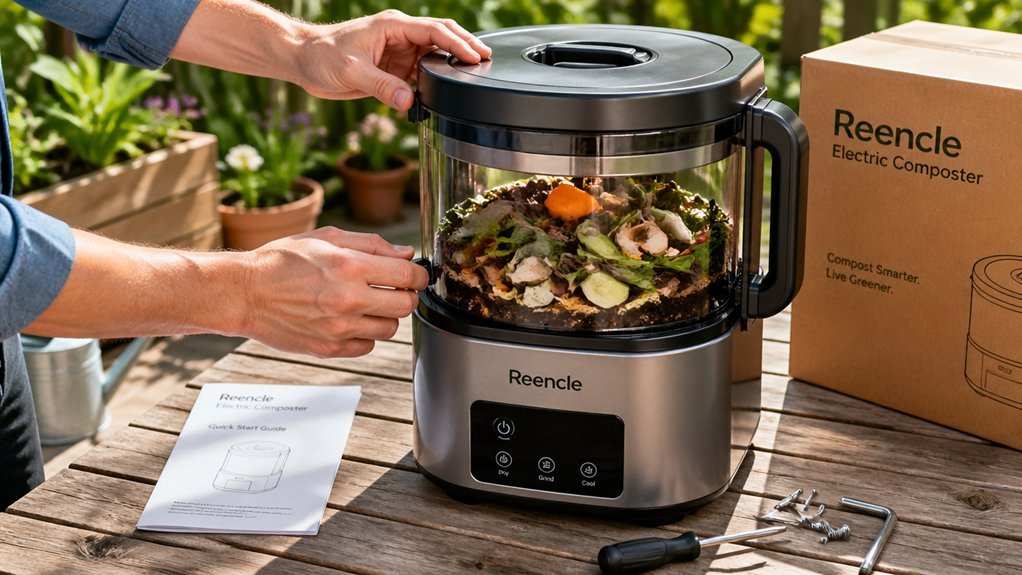
| Worm Bucket Indoor Composting Kit for Making Worm Castings and Worm Tea |  | Best for Beginners | Capacity: 2.5 gallons | Design Type: Single bin with spigot | Material: Food-safe plastic (#5 PP) | CHECK ON AMAZON | Read Our Analysis |
| Worm Farm |  | Best for Scaling | Capacity: 75 liters | Design Type: Stacked 5-tray system | Material: Sturdy PP plastic | CHECK ON AMAZON | Read Our Analysis |
More Details on Our Top Picks
Worm Bucket Indoor Composting Kit for Making Worm Castings and Worm Tea
Are you living in a space where traditional composting isn’t an option? The Worm Bucket Indoor Composting Kit offers you a practical solution for apartments, condos, and RVs. This 2.5-gallon bin features food-safe plastic construction and includes everything you’ll need: the composting bin, coco coir brick, perlite, and comprehensive instruction guides. You’ll appreciate the convenient spigot for draining nutrient-rich worm tea directly into a container. The kit’s beginner-friendly design makes it accessible even if you’re new to vermicomposting. You’ll produce both worm castings and worm tea, transforming your kitchen scraps into valuable garden amendments while managing waste responsibly in minimal space.
- Capacity:2.5 gallons
- Design Type:Single bin with spigot
- Material:Food-safe plastic (#5 PP)
- Space Requirements:Compact; suitable for apartments, condos, RVs
- Included Instructions:Two full-color instruction guides with feeding guide
- Primary Output:Worm castings and worm tea
- Additional Feature:Spigot for worm tea drainage
- Additional Feature:Beginner-friendly starter kit
- Additional Feature:Apartment/RV compatible size
Worm Farm
If you’re looking to transform kitchen scraps into nutrient-rich compost without taking up much space, the MINGLISCALE Worm Farm’s compact 75-litre capacity makes it ideal for households and small gardens. Its five-tray stacked design lets you manage multiple composting cycles simultaneously, so you’ll harvest finished compost faster than traditional methods. You’ll simply add bedding, worms, and organic waste to each tray, then monitor and feed them according to the included step-by-step manual. The sturdy polypropylene construction ensures durability while remaining user-friendly. Since you can stack additional units for expanded capacity, you’ll effortlessly scale your composting operation as needed, supporting sustainable living while recycling waste into valuable soil conditioner.
- Capacity:75 liters
- Design Type:Stacked 5-tray system
- Material:Sturdy PP plastic
- Space Requirements:Standard; designed for households or small gardens
- Included Instructions:Step-by-step user manual
- Primary Output:Nutrient-rich compost and soil conditioner
- Additional Feature:Stackable multi-tray design
- Additional Feature:75-liter capacity
- Additional Feature:Faster compost production
Factors to Consider When Choosing Worm Composting Instruction Guides
When you’re selecting a worm composting guide, you’ll want to prioritize beginner-friendly instructional clarity so you can understand the fundamentals without confusion. You should look for visual guides and diagrams that complement the text, along with detailed feeding schedule specifications and maintenance steps that’ll help you troubleshoot problems as they arise. Consider the space requirements and setup instructions too, since you’ll need guidance that matches your available area and lifestyle.
Beginner-Friendly Instructional Clarity
Because you’re starting your worm composting journey without prior experience, you’ll want a guide that prioritizes clarity above all else. Look for resources that use plain language and define specialized terms like “bedding” or “vermicompost” without assuming you know them already.
Step-by-step numbered instructions help you complete setup, feeding, and harvesting tasks confidently. Scannable layouts with short sections let you quickly find answers during hands-on work. Visual supports—labeled diagrams, photos, and flowcharts—show you exactly what to do rather than just telling you.
Strong beginner guides also include troubleshooting sections addressing common issues: odor problems, moisture imbalance, or worm escape. These practical solutions prevent frustration and keep your bin thriving. Quick-start checklists give you reference points you can check off as you progress.
Visual Guides And Diagrams
How quickly can you master worm bin assembly without getting bogged down in dense instructions? Visual guides and diagrams accelerate your learning curve dramatically. Step-by-step illustrations show you exactly how to layer bedding, maintain moisture levels, and check aeration—eliminating guesswork and reducing costly mistakes. You’ll grasp optimal worm-to-waste ratios instantly through clear visual representations rather than parsing lengthy paragraphs.
Quality instruction guides include diagrams distinguishing worm castings from worm tea, helping you harvest effectively without harming your colony. Infographics tackle common problems like odors, mold, and temperature fluctuations, offering quick troubleshooting reference during setup and maintenance. Labeled tracking systems for cycle stages—setup, feeding, harvesting—keep you organized and consistent. When evaluating guides, prioritize those featuring abundant, well-designed visuals that transform complex composting concepts into digestible, actionable steps.
Feeding Schedule Specifications
Beyond mastering the physical setup of your bin, you’ll need clear feeding schedule specifications to keep your worm colony thriving. The best guides outline starting amounts—typically no more than a handful of scraps daily for small bins—with gradual increases as your worm population expands. You’ll benefit from instructions on alternating feeding zones to prevent compaction and odor buildup while allowing adequate breakdown time.
Top guides specify balancing green and brown materials while explicitly listing forbidden items like meat, dairy, citrus, and oils. They’ll also include regular monitoring checkpoints for moisture, worm activity, and pH levels, helping you adjust feeding frequency and quantities based on actual conditions rather than guesswork.
Maintenance And Troubleshooting Steps
What separates a thriving worm bin from a problematic one? Maintenance and troubleshooting steps. The best guides break tasks into daily, weekly, and monthly routines that keep your bin healthy and odor-free. You’ll want clear instructions on managing bedding ratios, moisture levels, and carbon-to-nitrogen balance to prevent compaction and mold growth.
Look for guides that identify healthy colony signs—active worms, dark castings—versus red flags like bright white mold or soggy material. Visual aids and troubleshooting flowcharts help you quickly diagnose common issues: foul odors, slow decomposition, and anaerobic conditions. Each problem needs specific corrective actions you can implement immediately.
Comprehensive checklists let you monitor your bin consistently and catch problems early, ensuring long-term composting success.
Space Requirements And Setup
Once you’ve established a maintenance routine, you’ll need to contemplate where and how you’ll actually set up your bin. Your space determines which system works best for you. Compact 2.5-gallon bins fit tight apartments, while stackable multi-tray designs expand vertically for growing operations. Consider your bin’s footprint, height clearance, and accessibility when reaching in to feed worms or harvest castings. Built-in features like drainage spigots and transparent lids eliminate extra equipment needs. Ensure adequate ventilation to prevent odors, especially in small living spaces. You’ll want easy access to finished compost without major disruption to your home. Evaluate your available square footage and vertical space before selecting an instruction guide that matches your environment.
Harvesting And Tea Extraction
How you’ll harvest your worm castings and extract tea directly impacts which instruction guide serves you best. Look for guides explaining the stop-feeding method—stopping 1–2 weeks before harvest allows worms to migrate away, making collection easier.
The best guides detail harvesting from the top layer after mixing bedding and sieving larger particles. They’ll cover tea extraction methods like spigot draining or steeping castings in water for nutrient-rich liquid fertilizer.
Check whether guides address critical timing: brewed tea needs use within 24–72 hours, while cold storage lasts up to a week if properly aerated and kept dark. Quality guides also emphasize the 1:10 dilution ratio with water to prevent root burn and maintain safe nutrient levels for your plants.
Material Safety And Quality
The material your bin’s made from directly affects whether you’re producing safe compost or inadvertently introducing contaminants into your castings and tea. You’ll want guides that specify food-safe materials like #5 polypropylene, which prevents chemical leaching. Look for instructions addressing moisture, aeration, and feeding protocols tailored to your bin’s material properties—these prevent degradation and unsafe compost production.
Quality guides should reference Material Safety Data Sheets or certifications for bin components and bedding materials like coco coir and perlite. They’ll also detail proper disposal methods for spent bedding and used worm tea, ensuring compatibility with soil and plants while minimizing toxicity.
Finally, prioritize guides including clear safety notes on avoiding plastic degradation, chemical exposure, and mold growth, which directly impact both worm health and your handling safety.
Sustainability Impact Documentation
Why should you care about the environmental claims in your worm composting guide? Because greenwashing undermines your sustainability goals. Look for guides that quantify specific benefits—like kilograms of kitchen waste diverted from landfills or metric tons of CO2 avoided annually. You’ll want comparisons between worm bin carbon footprints and traditional composting methods, helping you understand real trade-offs. Examine documentation of resource inputs, including water consumption, electricity usage, and substrate materials across typical timelines. Assess packaging sustainability and end-of-life recyclability of equipment. Third-party certifications or eco-labels add credibility to environmental claims. Transparent, detailed metrics empower you to make genuinely sustainable choices rather than relying on vague promises.
Frequently Asked Questions
How Long Does It Take for Worms to Produce Usable Compost?
You’ll typically see usable compost in 3-6 months, though it can take up to a year depending on conditions. You’ll know it’s ready when you can’t recognize the original materials and it’s dark, crumbly, and earthy-smelling.
What Temperature Range Is Optimal for Worm Composting?
You’ll find that worms thrive best between 55-77°F. They’ll slow down outside this range, so you’ll want to keep your bin in a cool, dark spot. You’ll get optimal composting activity when you maintain temperatures closer to 77°F.
Can I Use Worms From My Garden for Composting?
You shouldn’t use garden worms for composting. You’ll need red wigglers or European nightcrawlers instead. Garden worms won’t survive in bins and won’t break down food scraps efficiently like composting worms do.
How Often Should I Feed My Worm Composting System?
You should feed your worm composting system once weekly or when you’ve noticed they’ve consumed most of the previous feeding. Don’t overfeed, as uneaten food’ll create odor problems and attract pests to your bin.
What Should I Do if My Worm Bin Starts Smelling Bad?
You’ll want to add more bedding material to absorb excess moisture and improve airflow. Reduce your feeding frequency, check that you’re not overfeeding, and ensure your bin’s drainage holes aren’t blocked. Turn the contents gently.

Leave a Reply